
Side Dishes
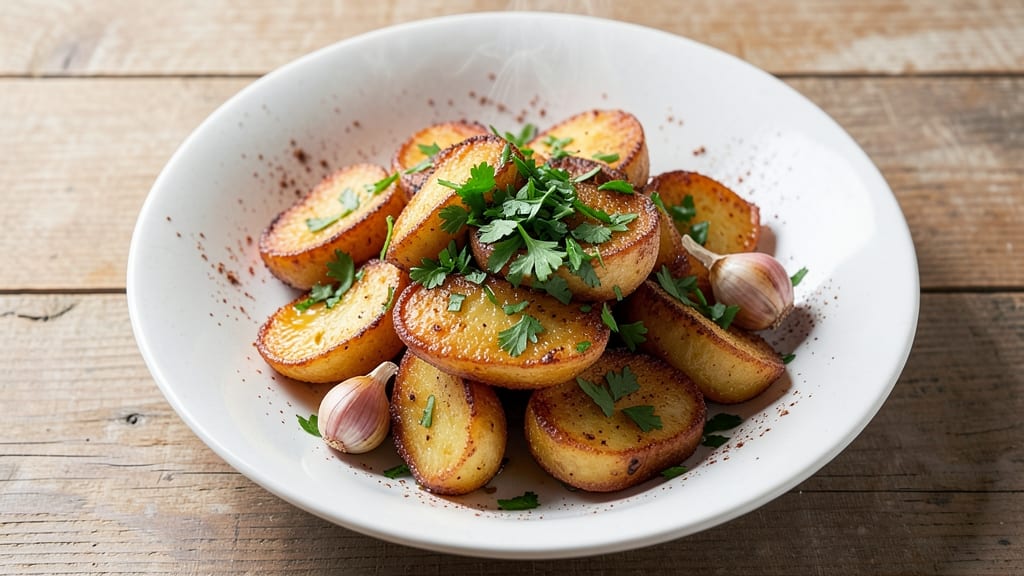
This fried canned potatoes recipe proves crispy, golden bites are just minutes away—no fancy prep or special equipment needed. The secret lies in proper draining, thorough drying, and the right frying technique, which turns these humble potatoes into a restaurant-worthy side dish.
I’ve perfected this method over countless batches, ensuring every piece comes out perfectly crispy without absorbing excess oil.
This recipe delivers foolproof results in just 15 minutes of active time, making it ideal for weeknight dinners or game-day appetizers. The key steps—draining well, patting dry, and frying in small batches—guarantee that every bite has that satisfying crunch while keeping the inside tender.
Whether you’re serving them as a standalone snack or pairing them with burgers, tacos, or steak, they’ll disappear faster than you can say "second helping."
What sets this method apart is the ability to customize flavors—garlic powder, smoked paprika, or even a sprinkle of fresh herbs can elevate these potatoes from simple to extraordinary. The frying process is straightforward, but attention to detail ensures crispy, even browning without the mess or grease of traditional deep-frying.
Safety tips are built into the process, so you can focus on enjoying the results rather than worrying about splatter or uneven cooking.
Once you master this technique, you’ll never settle for store-bought potato chips again. The versatility of these crispy bites means they work as a side, snack, or even a topping—proving that canned potatoes can be just as impressive as their fresh counterparts. Let’s get started on creating your perfect batch.
Ingredients for fried canned potatoes
Eight simple ingredients transform canned potatoes into crispy, golden bites perfect for any meal.
| Ingredient | Amount | Notes |
|---|---|---|
| Canned Potatoes 🥔 | 14 ½ oz | Drained, rinsed, and dried |
| Vegetable Oil 🫒 | 2 cups | For frying, high smoke point |
| Salt 🧂 | 1 tbsp | Kosher or sea salt |
| Garlic Powder 🧄 | 1 tsp | For flavor customization |
| Smoked Paprika 🌶️ | ½ tsp | Optional for smoky depth |
| Fresh Parsley 🌿 | 2 tbsp | Chopped, for garnish |
| Paper Towels 🧻 | 4 sheets | For thorough drying |
| Vegetable Oil Spray 🫒 | 1 spray | For light coating |
The canned potatoes are the star here—look for brands like Del Monte or Libby, which drain well and hold their shape. The key is thorough drying; skip this step and your potatoes will turn greasy. I always use paper towels to pat them completely dry before frying. For extra crispiness, Costco or Walmart sell bulk paper towels that work great. The vegetable oil is non-negotiable—stick with a high smoke point like Avocado or Canola to avoid burning. If you're short on time, pre-shredded potatoes from the canning aisle work too, but they’ll need extra drying time.
No garlic powder? Fresh minced garlic at double the amount works wonders, but it’s easier to measure the powder. Smoked paprika can be swapped for regular paprika or even a pinch of cayenne for heat. Fresh parsley is ideal, but dried parsley at half the amount gets the job done. Vegetable oil spray is handy, but a light brush of oil on a paper towel works just as well. For a crispier texture, double the oil spray and fry in smaller batches. And if you’re worried about mess, use a deep skillet with high sides—it makes cleanup way easier.
These crispy bites stay fresh for about 3 days if stored in an airtight container, but they’re best enjoyed immediately. For longer storage, freeze them for up to 2 months—just thaw and reheat in the oven at 400°F for 5-7 minutes to restore crispiness. I like to portion them into single-serving bags so they’re ready to grab for snacks or topping burgers. Pro tip: Keep a stash of dried parsley in your spice drawer for quick garnishes—it lasts forever.
Why You'll Love This Recipe
- Five-Minute Fix: I swear, this is the only potato dish where I actually measure the oil before pouring. No peeling, no chopping—just drain, pat dry, and fry. The canned potatoes hold their shape perfectly, so you get that satisfying crunch without the hassle of pre-cooking or slicing.
- Smoky Magic: That smoked paprika and garlic powder combo? It’s like a cozy hug in potato form. The potatoes soak up the flavor fast—no fancy marinating—so every bite has this warm, slightly smoky kick that makes them taste way more restaurant-worthy than they are to make.
- Game for Any Meal: Between us, I’ve served these as a snack with beer, a side for burgers, and even a quick lunch with a fried egg on top. They reheat like a dream (just a few seconds in the air fryer), so they’re my go-to for when I’m too tired to plan but still need something solid.
- Budget Win: Honestly, I buy the canned potatoes in bulk because they’re cheaper than fresh and they last months in the pantry. A single can feeds my whole family, and the oil stretches further than you’d think—especially if you reuse it for another fry-up later. No waste, all flavor.
Step-by-step instructions for crispy fried canned potatoes
Here's how to turn canned potatoes into perfectly crispy, golden bites with minimal effort.
Drain, Rinse, and Dry the Canned Potatoes Thoroughly
Drain the 14.5 oz canned potatoes completely, then rinse them under cold water to remove any excess starch. This step is crucial—starch makes the potatoes stick together and prevents crispiness. Drain them again and transfer to a clean bowl.
Spread the potatoes out on the 4 sheets paper towels and pat them dry with another set of dry paper towels. You want them bone-dry—no moisture left at all. If you skip this, your potatoes will steam instead of fry crispy. I like to press down firmly with the paper towels to soak up every last drop of water.
Lightly Coat the Potatoes with Oil
Lightly spray the dried potatoes with the vegetable oil spray until they're just barely coated. This creates a barrier that prevents the potatoes from absorbing too much oil during frying. The goal is a light, even coating—not a pool of oil.
Next, sprinkle the potatoes with 1 tablespoon salt, 1 teaspoon garlic powder, and 0.5 teaspoon smoked paprika. Toss them gently with your hands or a clean spatula until the seasoning sticks evenly. Don't overmix or you'll break them apart. I like to do this right before frying so the seasoning stays fresh.
Heat the Oil to the Right Temperature
Pour 2 cups vegetable oil into a deep skillet or Dutch oven. Use a thermometer to heat the oil to 350°F—this is the sweet spot for crispy potatoes without burning. If you don't have a thermometer, test the oil by dropping in a small piece of potato. It should sizzle and float to the surface within 10 seconds.
If the oil is too hot, the potatoes will burn on the outside before cooking through. If it's too cool, they'll absorb too much oil and turn greasy. Keep the heat at medium to maintain a steady 350°F temperature throughout frying.
Fry in Batches for Even Crispiness
Carefully add the potatoes to the hot oil, working in small batches so you don't lower the oil temperature too much. You'll likely need 2 batches—don't overcrowd the pan. Fry for 4-5 minutes, stirring occasionally, until they're golden brown and crispy on all sides.
Here's the thing—you want them to look like they're wearing a golden armor, not just pale yellow. If they're not browning quickly enough, your oil might need a minute to recover. The potatoes are done when they're deep golden with a crisp texture that holds up to a fork test.
Drain and Garnish for Maximum Crunch
Transfer the fried potatoes to a plate lined with fresh paper towels to drain any excess oil. Work quickly so they stay crispy. Sprinkle with the 2 tablespoons chopped fresh parsley right away while they're still hot. The parsley adds a fresh contrast to the smoky, garlicky flavor.
Serve immediately while they're at their crispest. If you let them sit too long, they'll start to soften. These potatoes are perfect as a side dish, snack, or even a topping for salads. The secret to keeping them crispy is serving them right after frying—don't wait!
Pro Tips For Making Fried Canned Potatoes
- Drain and Pat Dry: Canned potatoes come swimming in their own brine—skip the rinse, but absolutely drain them well and roll them in a clean towel. I learned this the hard way when my first batch turned into a greasy mess because the oil couldn’t crisp what was basically a wet sponge.
- Use Two Heat Zones: Start frying over medium-high heat until the potatoes sizzle and release starch (about 3 minutes), then lower to medium. The initial high heat sears the outside, while the lower finish cooks through without burning the paprika. (Yes, even if you’re impatient like me.)
- Season After Frying: Salt and spices cling better to dry, hot potatoes—wait until they’re golden and out of the oil. Sprinkle garlic powder and smoked paprika right away while they’re still piping, or they’ll just sit like sad dust on top. (Your future self will thank you.)
- Add a Pinch of Sugar: Sounds weird, but it works: toss in ¼ teaspoon of sugar with the spices. It caramelizes just enough to deepen the flavor without making them sweet. I was skeptical until I tried it—now it’s non-negotiable for me.
Pro cooking tips for perfect results
Oil Temperature Control
Your oil temperature is the single most important factor for crispy fried canned potatoes. Heat your vegetable oil to exactly 350°F using a candy or deep-fry thermometer. I recommend the Thermoworks Thermapen—it's precise and fast.
If you don't have a thermometer, test with a small potato piece: it should sizzle and float within 10 seconds. Too hot? The potatoes burn. Too cool? They absorb oil and turn greasy. Keep heat at medium to maintain that perfect 350°F window. 🌡️
Batch Frying Secrets
Never overcrowd your pan—this is where most home cooks fail. Fry in 2 batches maximum to maintain oil temperature. I use a 12-inch cast iron skillet from Lodge because it holds heat well and has high sides to prevent splatter.
Stir potatoes every 30 seconds with a slotted spoon to ensure even browning. If they're not golden after 4-5 minutes, your oil needs more time to recover—just give it 1-2 minutes at 350°F before trying again.
Drying Like a Pro
This is the step most people skip—and it's what separates good from great. After draining and rinsing, spread potatoes on 4 sheets of paper towels and press with another dry set. I like to use Bounty paper towels because they're extra absorbent.
Let them air-dry for 5 minutes on a wire rack if you're really impatient. Any moisture left will cause steaming instead of frying, resulting in soggy potatoes. Trust me, 10 extra minutes of drying now saves you from greasy bites later. 💡
Seasoning Timing Matters
Season your potatoes right before frying—this keeps the spices fresh and prevents them from burning in the oil. I always use kosher salt because it dissolves evenly. Toss gently with your hands or a spatula until fully coated.
For extra flavor, add ½ teaspoon onion powder or ¼ teaspoon cayenne pepper to the mix. The key is to season just before frying so the flavors stay vibrant and don't get lost in the oil. Pro tip: Use a fine-mesh strainer to drain excess seasoning if needed.
Oil Management Tips
Reuse your frying oil for up to 3 batches if properly filtered. After each use, pour oil through a fine-mesh sieve lined with a coffee filter to remove potato bits. Store in an airtight container at room temperature for next time.
For first-time frying, use 2 cups fresh oil—this gives enough volume for 2 batches without overcrowding. Never reuse oil that smells burnt or has dark particles. Fresh oil every 3-4 fry sessions keeps your potatoes consistently crispy. ⚡
Nutrition facts
Frequently asked questions
Can I use any brand of canned potatoes for frying?
Not all brands work equally well—look for brands like Del Monte or Libby that drain efficiently and hold their shape. Avoid pre-cooked styles with added sauces or seasonings, as they contain moisture that prevents crispiness. For best results, stick to plain, diced or shredded varieties labeled "for frying" or "all-purpose."
How do I keep my fried potatoes from getting soggy?
The key is thorough drying and immediate serving. After draining, pat potatoes completely dry with 4-6 paper towels and let them air-dry on a wire rack for 5 minutes. Fry in small batches at 350°F and serve straight from the fryer—soggy potatoes result from trapped moisture or sitting too long. Keep a fresh batch of paper towels nearby to drain excess oil immediately after frying.
Can I bake these instead of frying for a healthier option?
Toss the dried potatoes with 1 tablespoon oil and seasonings, then spread on a baking sheet. Bake at 425°F for 25-30 minutes, flipping halfway, until golden. While not as crispy as fried, this method reduces oil by 70% while still delivering satisfying texture. For extra crunch, broil for 2 minutes at the end.
What's the best way to reheat leftover fried potatoes?
Reheat in a 350°F oven for 5-7 minutes on a wire rack to restore crispiness. Avoid microwaving—they'll turn greasy. For stovetop reheating, use a nonstick pan with 1 teaspoon oil over medium heat for 2-3 minutes per side. Always reheat in small batches to maintain texture. Store leftovers in an airtight container for up to 3 days.
Can I make these potatoes ahead of time?
For best results, fry fresh and serve immediately. However, you can par-cook them by frying 3 minutes shorter than directed, then store in an airtight container for 1 day. Re-crisp in the oven at 400°F for 5 minutes before serving. For long-term storage, freeze fried potatoes (unseasoned) for up to 2 months—reheat directly from frozen in the oven for 8-10 minutes.