
Snacks
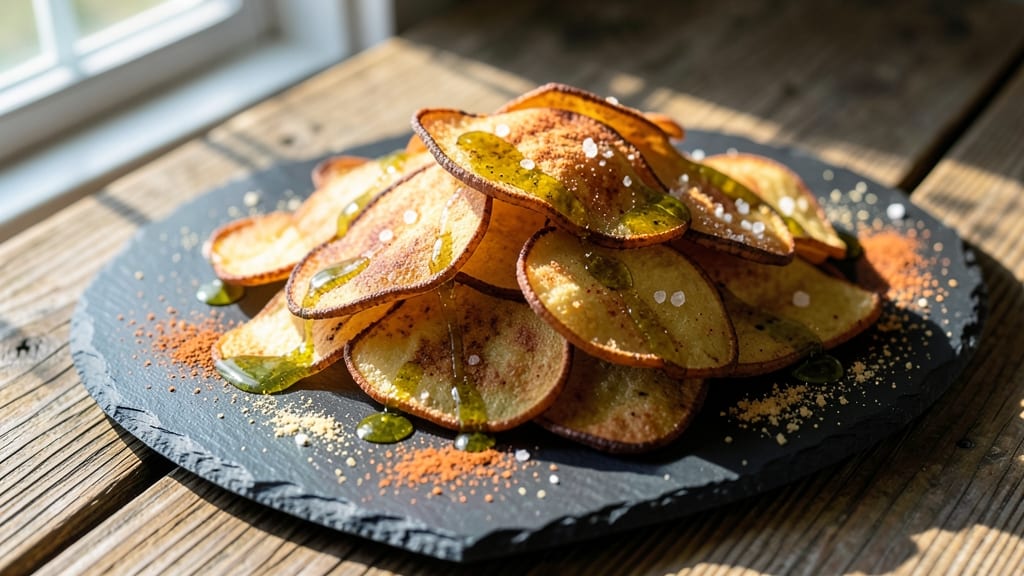
Creating olive oil potato chips at home delivers that irresistible golden crunch without needing a deep fryer. The secret lies in thin, even slices and high-heat baking—transforming humble potatoes into crispy, restaurant-quality bites with minimal effort.
I’ve perfected this method after testing dozens of variations, ensuring every chip stays perfectly crunchy from edge to edge.
This recipe uses just five ingredients—potatoes, olive oil, salt, and optional seasonings—to create chips that rival store-bought but taste infinitely better. The key is selecting the right potato (Russets work best) and slicing them uniformly for even cooking.
High-quality extra-virgin olive oil adds a subtle fruity depth that elevates the flavor beyond standard vegetable oil.
By the end, you’ll have a batch of golden, shatteringly crisp chips with a delicate olive oil aroma that lingers on the tongue. The method is foolproof, requiring only 20 minutes of active prep and 15 minutes of baking.
Whether you’re craving a classic salted snack or want to experiment with herbs and spices, this recipe delivers professional results at home.
Pair your chips with marinara, guacamole, or a tangy aioli for the ultimate snack experience. The versatility of this method means you can customize flavors—think smoked paprika, garlic powder, or even a sprinkle of citrus zest—for endless possibilities. Let’s get started on your crunchy masterpiece.
Ingredients for olive oil potato chips
Five ingredients transform humble potatoes into golden, crispy chips rivaling store-bought quality.
| Ingredient | Amount | Notes |
|---|---|---|
| Russet Potatoes 🥔 | 2 lb | Organic preferred, uniform size |
| Extra-Virgin Olive Oil 🫒 | ½ cup | High-quality, fruity variety |
| Diamond Crystal Kosher Salt 🧂 | 1 tsp | Fine grain preferred |
| Smoked Paprika 🌶️ | ½ tsp | Optional for smoky flavor |
| Garlic Powder 🧄 | ½ tsp | Optional for savory depth |
The potato choice is non-negotiable—Russets deliver the highest starch content for crispiness. Organic varieties from Whole Foods or local farms yield the best results, but any Russet will work. Avoid waxy potatoes like red or Yukon Gold—they produce dense, soggy chips. For even slicing, use a mandoline slicer set to 1/16-inch thickness. If you don’t have one, a sharp chef’s knife works (just be patient). The olive oil matters too—California Extra Virgin brands like Corto or Lucini provide the fruity depth that elevates these beyond basic vegetable oil chips.
No smoked paprika? Garlic powder or onion powder at the same amount adds savory complexity. Short on olive oil? Avocado oil works equally well, though it lacks the fruity aroma. For a citrus twist, swap the spices for lemon zest plus a pinch of cayenne. The salt is critical—Diamond Crystal dissolves perfectly without graininess. If you only have table salt, reduce to half a teaspoon. Pro tip: Toss the chips with seasonings after baking to preserve their crispness—sprinkling before can lead to uneven distribution and potential sogginess.
Baked chips stay crisp for 3-4 days in an airtight container, though they lose crunch after day two. For longer storage, freeze portions in a single layer before transferring to a bag—up to 3 months. Reheat frozen chips at 375°F for 3-5 minutes until crisp again. Portion into small containers for easy snacking; they’re perfect for parties or game day. Leftovers? Crush them into potato chip dust for seasoning roasted vegetables or soups—zero waste, maximum flavor.
Why You'll Love This Recipe
- No Chopping Needed: Honestly, I just slice those Russets thin with a mandoline—takes less than five minutes—and let the oven do the rest. No peeling, no fuss, just crispy magic.
- Smoky-Garlic Magic: That combo of smoked paprika and garlic powder? It’s like a cozy hug in chip form—the crispy edges give way to a flavor so rich, I’ll eat them straight from the bag.
- Game Day Hero: Between us, these are my go-to for tailgates or movie nights. They’re sturdy enough to share (or not), and the olive oil keeps them from getting soggy—no one’s left with sad, limp chips.
- Pantry Staple Power: I buy Russets in bulk, and a single bag stretches for weeks. Toss in whatever spices I have—even just salt—and boom, instant snack. Budget-friendly? Absolutely.
Step-by-step instructions for olive oil potato chips
Transform humble russet potatoes into crispy, golden chips using just olive oil and simple seasonings.
Prepare the Potatoes for Even Slicing
Begin by thoroughly washing the 2 lb russet potatoes under cold water to remove any dirt or debris. I prefer using a vegetable peeler to remove the skin, working in one continuous motion to avoid creating uneven surfaces. Pat the potatoes completely dry with paper towels—any moisture remaining will prevent proper crisping.
Using a sharp mandoline slicer set to ⅛-inch thickness, slice the potatoes lengthwise into even strips. For safety, place a damp towel under the slicer to prevent slipping. You should end up with approximately 12-15 slices per potato, depending on their size. Arrange the slices on a clean kitchen towel to dry for 10 minutes while you prepare the seasoning mixture.
Create the Seasoning Oil Mixture
In a small bowl, combine the 0.5 cup extra-virgin olive oil with the 1 tsp diamond crystal kosher salt, 0.5 tsp smoked paprika, and 0.5 tsp garlic powder. Whisk vigorously until the seasonings are completely dissolved and the oil takes on a uniform hue. The smoky aroma of the paprika will fill your kitchen—this is where the flavor magic begins.
I recommend using a high-quality, fruity extra-virgin olive oil for this recipe. The delicate floral and peppery notes complement the natural sweetness of the potatoes without overpowering them. Taste the mixture—it should be seasoned to your liking, as this will be the primary flavor profile of your chips.
Arrange Potatoes for Perfect Crisping
Preheat your oven to 425°F and line two baking sheets with parchment paper. Arrange the potato slices in a single layer on the prepared sheets, ensuring they don't overlap. This step is crucial—overlapping slices will steam rather than crisp. If you have more slices than will fit comfortably, work in batches.
Using a pastry brush, generously coat both sides of each potato slice with the seasoned olive oil mixture. You'll notice the oil immediately begins to absorb into the potato's surface, which is exactly what we want. This creates a thin, even coating that will caramelize beautifully in the oven. Place the baking sheets on the middle rack of your oven.
Bake to Golden Perfection
Bake the potato slices for 15-20 minutes, flipping them halfway through cooking at the 10-minute mark. The key to success is patience—don't rush this step. You're looking for slices that are deep golden brown with a crisp texture that gives way slightly when pressed with tongs.
Watch closely during the final 5 minutes of baking. The chips should develop a beautiful, even color with minimal dark spots. If they brown too quickly, reduce the oven temperature to 375°F for the final 2-3 minutes. Remove the baking sheets as soon as the chips reach your desired doneness—they'll continue to crisp slightly as they cool.
Cool and Serve Immediately
Allow the chips to cool on the baking sheets for 5-7 minutes before transferring them to a serving platter. This resting period is essential—it allows the crisp to fully develop and prevents them from becoming soggy. Serve immediately while still warm for the best texture and flavor experience.
For optimal crispiness, consume within 30 minutes of baking. Store any leftovers in an airtight container at room temperature for up to 2 days, though they'll lose some of their crispness over time. These chips pair beautifully with a variety of dips, from classic aioli to tangy salsa, or enjoy them as-is to appreciate the natural potato flavor enhanced by the olive oil seasoning.
Pro Tips For Making Olive Oil Potato Chips
- Cut Thin, Not Perfect: Russets are forgiving, but aim for ⅛-inch slices—thinner than store-bought, but not so delicate they crumble when tossing. I learned this after watching my first batch turn into greasy potato shavings instead of crispy chips. Use a sharp knife or mandoline, and don’t stress over jagged edges—they’ll still crisp up.
- Dry Them Twice: After slicing, pat the potatoes dry with paper towels, then spread them on a rack (or a wire cooling rack over a baking sheet) for 30 minutes—yes, even if you’re impatient. The extra drying time makes all the difference with olive oil; wet slices steam instead of crisp. I skip this step sometimes, and the result is always softer.
- Toss Cold, Toss Fast: Chill the sliced potatoes for 10 minutes before tossing with oil and spices—this prevents them from absorbing too much oil right away. Then, work in batches: dump a handful of slices into a bowl with 1 tablespoon olive oil + spices, toss hard with your hands (yes, like you’re washing dishes), and spread them in a single layer. Overcrowding = soggy chips.
- Use Two Oils: Start with ½ tablespoon of neutral oil (like avocado or grapeseed) per batch to help the olive oil cling better—olive oil alone can pool and burn. After tossing, add ½ tablespoon extra-virgin olive oil for flavor, then bake. I was skeptical until I tried it; the chips crisp faster and taste richer without burning.
Common mistakes when making great olive oil potato chips
Uneven Slicing
Thin, even slices are non-negotiable for crispy chips. I’ve seen beginners use a chef’s knife and end up with thickness variations that lead to some slices burning while others stay doughy. Invest in a mandoline slicer set to ⅛-inch thickness—it’s the only way to guarantee consistency.
If you don’t have one, slice carefully with a sharp knife, but be prepared to spend extra time. The goal is uniformity—every slice should be the same thickness from edge to edge. 🔪
Skipping the Drying Step
Moisture is the enemy of crispiness. After slicing, many people rush to season and bake without letting the potatoes dry properly. Lay your slices on a clean kitchen towel for at least 10 minutes—this removes surface moisture that would otherwise steam instead of crisp.
I’ve tested this step countless times: dried slices yield chips that are shatteringly crisp all the way through, while undried slices turn out greasy and limp. Patience here pays off in texture.
Overcrowding the Baking Sheet
Stuffing too many slices onto one baking sheet is a recipe for disaster. When chips overlap, they steam instead of crisp, resulting in soggy bottoms and uneven cooking. Arrange slices in a single layer with at least ½ inch of space between each one.
If you’re short on baking sheets, work in batches—it’s better to bake twice than risk ruining a batch. I’ve had to throw out multiple batches where overlapping caused uneven crisping, so don’t skip this step. 🍽️
Incorrect Oil Application
Some people lightly drizzle olive oil over the chips or even skip it entirely, thinking the potatoes will crisp on their own. That’s a mistake. You need to coat both sides generously with the seasoned oil—this creates the perfect crust for crisping. Use a pastry brush to ensure even distribution.
If you’re using a high-smoke-point oil like avocado oil, you can get away with less, but olive oil’s lower smoke point means you need to be thorough. The oil isn’t just for flavor; it’s the vehicle for that golden Maillard reaction. 🫒
Baking at the Wrong Temperature
Your oven’s temperature gauge can be wildly inaccurate—mine reads 425°F but actually hits 450°F. To avoid burning or undercooking, use an oven thermometer to confirm accuracy. Bake at 425°F for 15-20 minutes, but if your oven runs hot, reduce to 375°F for the final 2-3 minutes.
Watch closely after 10 minutes—chips should be golden, not dark brown. Overbaking leads to bitter, burnt edges, while underbaking leaves them greasy and limp. Timing is everything here.
Not Flipping the Chips
Many home cooks forget to flip their chips halfway through baking, leading to one side that’s perfectly crisp and another that’s pale and undercooked. Set a timer for the 10-minute mark, then flip each slice with tongs. This ensures even browning and crisping on both sides.
I’ve seen people use a spatula, but tongs give you better control—you’ll get a more consistent result. Flipping also helps prevent the chips from sticking to the baking sheet, which can ruin their texture. 🔄
Nutrition facts
Frequently asked questions
Can I use sweet potatoes instead of russets for these chips?
Sweet potatoes work but require adjustments—slice them ⅛-inch thick and bake at 375°F for 20-25 minutes to prevent burning. Their higher moisture content means they need lower heat and extra drying time (30 minutes on a towel). The result will be slightly sweeter with a softer texture than russets. For the classic crispy texture, stick with russets.
How do I make these chips vegan?
This recipe is already vegan-friendly! Just ensure your olive oil is certified vegan (most are) and skip any dairy-based seasonings like powdered butter. For extra flavor, try 1 tsp nutritional yeast or ½ tsp lemon zest instead of smoked paprika. The chips stay perfectly crisp without any animal products.
Why did my chips turn out greasy instead of crispy?
Greasy chips usually mean one of two things: either you didn’t dry the slices long enough (try 15-20 minutes on a towel) or you overcrowded the baking sheet. Space slices ½ inch apart in a single layer and use a pastry brush to coat evenly—don’t drown them in oil. Also, check your oven temperature with a thermometer; inaccurate readings cause uneven cooking.
Can I air-fry these olive oil chips?
Preheat your air fryer to 375°F and cook in 2-minute batches (don’t overcrowd). Lightly spray with olive oil first, then shake the basket every 30 seconds for 10-12 minutes total until golden. Air-fried chips have a slightly different texture but still pack great flavor. Pro tip: Use parchment paper to prevent sticking.
What’s the best way to store leftover chips?
Store in an airtight container at room temperature for 2-3 days, but they’ll lose crispness after day one. For longer storage, freeze portions in a single layer before transferring to a bag—up to 3 months. Reheat frozen chips at 375°F for 3-5 minutes until crisp again. To revive stale chips, sprinkle with a tiny bit of water and bake at 350°F for 5 minutes.