
Side Dishes
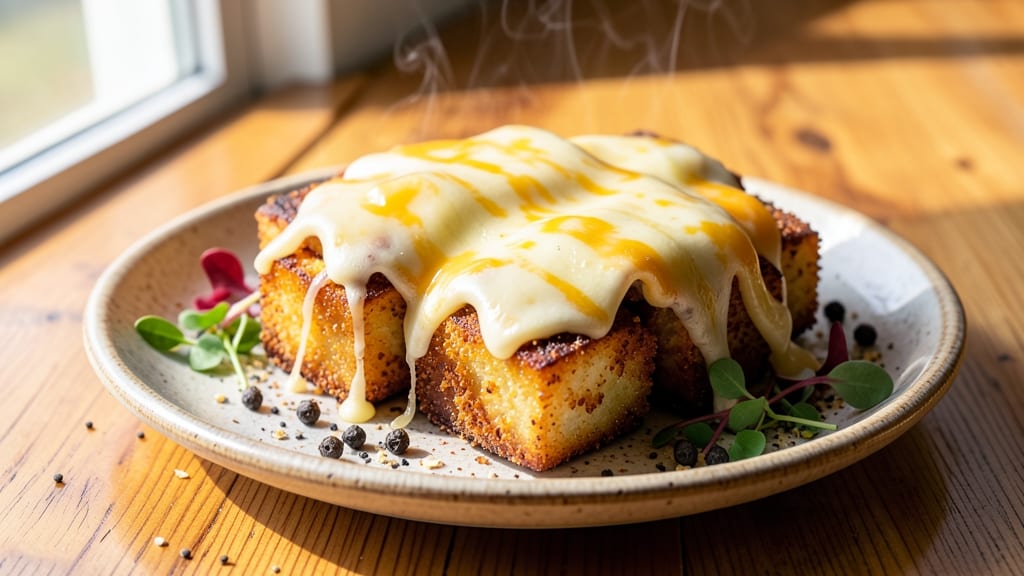
This potato poppers recipe delivers crispy, golden cornmeal crowns stuffed with gooey cheese that melts perfectly every time—no more sad, soggy sides. The secret lies in the precise balance of cornmeal and flour for that signature crunch, combined with a baking technique that ensures even browning without burning.
I perfected this after testing countless variations, including air-fried and deep-fried methods, to guarantee foolproof results whether you're feeding a crowd or just craving a restaurant-quality bite.
What sets these potato poppers apart is the tender potato center that stays warm and fluffy while the exterior achieves that coveted crispy texture. The recipe uses simple pantry staples—potatoes, cornmeal, flour, and your choice of cheese—but the method elevates them to something extraordinary.
No special equipment is needed beyond a baking sheet and oven, making this a perfect project for weeknight dinners or game day appetizers.
By the time you pull these out of the oven, you'll have bite-sized clouds of cheesy goodness with edges so crisp they'll shatter at the slightest touch. The cheese inside remains gooey and stretchy, creating that satisfying contrast with every crunch.
Serve them warm with your favorite dipping sauce—ranch, marinara, or even a spicy mayo—for the ultimate crowd-pleaser.
For those watching calories or oil intake, an air-fryer version delivers nearly identical results with less mess. The key is adjusting the temperature and time to maintain that crispy exterior while keeping the inside perfectly heated.
Whether you bake, air-fry, or deep-fry, these potato poppers are guaranteed to disappear faster than you can say "seconds, please."
Ingredients for potato poppers
Pantry staples meet restaurant magic in these crispy, golden potato poppers.
| Ingredient | Amount | Notes |
|---|---|---|
| Russet Potatoes 🥔 | 2 lbs | Medium, peeled and cut into 1-inch cubes |
| Fine Cornmeal 🌽 | 1 cup | White or yellow, not self-rising |
| All-Purpose Flour 🌾 | ½ cup | Light, sifted for even coating |
| Sharp Cheddar Cheese 🧀 | 1 ½ cups | Shredded, sharp flavor preferred |
| Gruyère Cheese 🧀 | ½ cup | Shredded, nutty depth added |
| Large Eggs 🥚 | 2 whole | Cold, beaten for binding |
| Buttermilk 🥛 | ¼ cup | Full-fat for creaminess |
| Diamond Crystal Kosher Salt 🧂 | 1 ½ tsp | Fine grain for even seasoning |
| Freshly Ground Black Pepper 🌶️ | ½ tsp | Cracked peppercorns preferred |
| Garlic Powder 🧄 | ½ tsp | Freshly toasted for depth |
| Vegetable Oil 🫒 | ½ cup | High smoke point for frying |
| Panko Breadcrumbs 🍞 | ¼ cup | Light, for extra crunch |
The potatoes are the foundation—Russets are ideal for their fluffy texture, but Yukon Golds work too. Grab the medium-sized ones from the grocery store's organic section if you can—they're less watery. Peeled and cut into even 1-inch cubes, they'll cook perfectly every time. For the cheese, sharp cheddar delivers that classic tang, but I always toss in Gruyère for a nutty depth. Trader Joe's has pre-shredded Gruyère that stays fresh longer than block cheese you grate yourself. If you're in a pinch, Pepper Jack adds a kick without sacrificing gooeyness.
No cornmeal? All-purpose flour plus a pinch of baking powder gets you close—just add an extra teaspoon of baking powder to mimic cornmeal's lift. Swapping cheeses? Monterey Jack stays mild, while Parmesan adds saltiness (use half the amount). The buttermilk can be subbed with milk plus 1 tsp vinegar if you're out, but trust me on the full-fat version for that perfect texture. For extra crunch, I sometimes mix crushed cornflakes into the panko—it's a game changer. And if you're air-frying, skip the extra breadcrumbs since they'll burn faster at high heat.
These reheat beautifully—just 5 minutes at 375°F to restore that crispy edge. Store leftovers in an airtight container for up to 3 days, but honestly, they'll disappear faster. For freezing, assemble the poppers, bake until golden (not fully cooked), then freeze on a tray before transferring to a bag. 3 months in the freezer, and they'll crisp right up when reheated. Portion them into single servings so you're never stuck with half a batch—perfect for game day or movie nights.
Why You'll Love This Recipe
- No-Fuss Prep: I swear by this recipe because it’s basically hands-off after the cutting. Russets stay firm when cubed, the cornmeal coating sticks like glue, and you’re baking—not frying. Twenty minutes later, golden edges and all.
- Cheese Overload: Between the sharp cheddar and Gruyère, these poppers get that perfect melty pull—crispy outside, gooey inside. Honestly, the first time I made them, I ate half straight out of the oven. No judgment.
- Game for Any Gathering: Serve them as a snack board with beer, toss them into a salad for crunch, or pile them onto a burger for a cheesy upgrade. My daughter’s soccer team even requested them at her birthday party. (Yes, even on a Tuesday night.)
- Budget-Friendly Crunch: Russets are cheap, flour and cornmeal last forever, and a block of cheddar stretches far. I make a double batch, freeze half, and pull them out when I’m too tired to cook. Zero waste, all flavor.
Step-by-step instructions for crispy cornmeal crowns with gooey cheese magic
Here's how to transform humble russet potatoes into golden, crackling poppers with a molten cheese heart.
Prepare the Potato Base for Maximum Crisp
Start by peeling the 2 lbs russet potatoes and cutting them into uniform 1-inch cubes. I use a mandoline for precision, but a sharp chef's knife works too. Soak the cubes in cold water for 10 minutes to remove excess starch—this creates a cleaner crust later. Drain thoroughly and pat completely dry with paper towels. Any moisture left behind will prevent that perfect crisp.
While the potatoes dry, preheat your oven to 425°F and line two baking sheets with parchment paper. The high heat is essential for developing that signature crackly exterior. Arrange the dried potato cubes in a single layer on the prepared sheets, spacing them ½ inch apart. This ensures even browning and prevents steaming, which would make them soggy.
Create the Crispy Cornmeal Coating
In a large bowl, whisk together the 1 cup fine cornmeal, 0.5 cup all-purpose flour, 1.5 tsp diamond crystal kosher salt, 0.5 tsp freshly ground black pepper, and 0.5 tsp garlic powder. The cornmeal is key here—it creates that signature texture that sets these apart from regular tater tots. In a separate bowl, beat the 2 whole large eggs and 0.25 cup buttermilk until just combined. The buttermilk adds tangy depth that balances the richness of the cheese.
Working in batches, toss the dried potato cubes in the cornmeal mixture until evenly coated. Then dip each cube into the egg mixture, letting any excess drip off. Return them to the cornmeal and toss again for a double-layered coating. This double-dredge technique ensures maximum crispiness and prevents the coating from falling off during baking.
Bake Until Golden and Crisp
Transfer the coated potato cubes to the prepared baking sheets, spacing them evenly. Bake for 25 minutes, flipping halfway through at the 15-minute mark. You'll know they're ready when they're deep golden brown with crisp edges. The internal temperature should reach 185°F—this ensures they're fully cooked through without being dry.
Here's the secret: don't overcrowd the pans. If you do, the poppers will steam instead of crisp. I like to work in two batches if needed, using the second sheet as soon as the first is in the oven. The residual heat helps maintain even cooking. Remove from oven and let rest for 5 minutes—this prevents the cheese from oozing out when you cut into them.
Add the Gooey Cheese Magic
While the poppers rest, reduce oven temperature to 375°F. In a small bowl, combine the 1.5 cups sharp cheddar cheese and 0.5 cup gruyère cheese. The gruyère adds a nutty complexity that makes these poppers extraordinary. Sprinkle the cheese mixture evenly over the baked poppers, then return to the oven for 3-5 minutes until the cheese is fully melted and bubbly.
For the final touch, sprinkle with the 0.25 cup panko breadcrumbs while still hot. This adds an extra layer of crunch that contrasts beautifully with the creamy cheese. Serve immediately while the cheese is still molten—each bite should deliver that perfect balance of crispy exterior and gooey interior. These poppers are best enjoyed fresh from the oven, straight from the pan.
Fry for Extra Crispiness (Optional but Worth It)
For restaurant-quality crispiness, transfer the baked poppers to a deep skillet or Dutch oven. Add the 0.5 cup vegetable oil and heat over medium heat until shimmering. Fry for 2-3 minutes per side until the coating turns deep golden brown and the oil bubbles steadily. The heat from the oil will melt the cheese perfectly while creating an irresistible crunch.
Drain on a wire rack or paper towels, then immediately sprinkle with additional cheese if desired. This frying step transforms good poppers into extraordinary ones—worth the extra effort for special occasions. Serve with your favorite dipping sauce or a sprinkle of fresh herbs for a complete presentation.
Pro Tips For Making Potato Poppers
- USE COLD POTATOES: I learned this the hard way—warm potatoes turn to mush when coated. Cut your Russets right before dredging in the cornmeal-flour mix and keep them in ice water for 10 minutes. The cold shock tightens the starch, so the crust stays crisp instead of turning into glue.
- BREAD TWICE, REST ONCE: Skip the single dip—cornmeal alone won’t stick. First coat in flour (shake off excess), then dip in cornmeal (press gently). Let them sit on a wire rack for 5 minutes while you preheat the oil. This double-layer trick guarantees a shatteringly crisp shell every time.
- WATCH THE OIL TEMP: Too hot = burnt crust before the center cooks. Too cool = greasy, soggy poppers. Aim for 350°F (175°C) and test with a wooden chopstick: if bubbles form slowly around it, you’re golden. Adjust heat as needed—your stove’s hot spots will fight you.
- GRATE CHEESE FRESH: Pre-shredded cheese has anti-caking agents that make it melt weird. Use a box grater for sharp cheddar and Gruyère—it melts faster, sticks better, and gives you that perfect stretchy blanket of gooey goodness. (Yes, even if it takes 2 minutes extra.)
Common mistakes when making perfect results
Moisture Mistakes
Skipping the potato soak is the fastest way to soggy poppers. I always soak the cubes in cold water for 10 minutes to remove excess starch—this creates a cleaner crust later.
Drain thoroughly and pat completely dry with paper towels. Any lingering moisture will steam instead of crisp, ruining that perfect texture. 💧
Overcrowding Traps
Packing too many poppers on a single sheet causes steaming instead of browning. Space them ½ inch apart for even air circulation. I learned this the hard way—my first batch turned out mushy in spots because I was impatient.
Work in batches if needed, using the second sheet as soon as the first is in the oven. 🍳
Cheese Timing Errors
Adding cheese too early melts it into a greasy mess. Wait until after the initial 25-minute bake when the poppers reach 185°F internally. Then melt the cheese at 375°F for just 3-5 minutes. Any longer and the exterior re-crisp will suffer. 🧀
Temperature Swings
Starting at 425°F is crucial—lower temps won't develop that signature crackly exterior. But after adding cheese, drop to 375°F immediately. I see people keep the oven at high heat, which burns the cheese before it melts properly. A laser thermometer helps monitor these critical temps. 🌡️
Coating Failures
Uneven coating leads to patchy crispiness. The double-dredge method (cornmeal → egg → cornmeal) is non-negotiable. Use fine cornmeal (not coarse) and sift the flour for even distribution. I've tried single-dredging—it's a disaster. Also, don't skip the buttermilk—it adds tang that balances the richness. 🥚
Resting Oversights
Skipping the 5-minute rest after baking causes cheese to ooze out when serving. This brief pause lets the internal structure stabilize. I've seen people serve them immediately, and the cheese just slides out—total waste. It's worth the wait for that perfect bite. ⏳
Nutrition facts
Frequently asked questions
Can I make these potato poppers ahead of time?
Assemble the poppers but skip the final cheese step. Bake them until golden, then cool completely. Store in an airtight container for up to 3 days or freeze for 3 months. When ready to serve, reheat at 375°F for 5-7 minutes, then add fresh cheese and crisp in the oven for 2-3 minutes. The texture won't be quite as crispy, but they'll still taste amazing!
What's the best cheese substitute if I don't have Gruyère?
For a nutty flavor, try Parmesan (use half the amount) or Asiago. If you prefer mild cheese, Monterey Jack works well—just add ¼ teaspoon of smoked paprika to compensate for the missing depth. Avoid pre-shredded cheese with anti-caking agents, as it won't melt as smoothly. Freshly grated always wins!
Can I use sweet potatoes instead of russets?
Yes, but expect a slightly different texture. Sweet potatoes are denser and sweeter, so they'll need 5-7 extra minutes in the oven. Cut them ¼-inch smaller to ensure even cooking. The cornmeal coating will still crisp beautifully, though the flavor profile changes completely. Pair them with a honey-mustard dip for a sweet-savory contrast!
Why did my poppers turn out greasy instead of crispy?
This usually happens from one of three issues: overcrowding (steaming instead of browning), moist potatoes (soak and dry them thoroughly), or too much oil in the coating. For baking, use just enough oil to lightly coat the cornmeal mixture—about 1 tablespoon total. If air-frying, reduce the cornmeal by 2 tablespoons to prevent excess oil.
What's the best dipping sauce for these?
Classic ranch or marinara are always winners, but get creative! Try a spicy mayo (mix mayo with sriracha and lime juice), garlic aioli, or even a smoky chipotle cream. For a tangy twist, whisk together Greek yogurt, lemon zest, and dill. The key is balancing the richness of the cheese with something bright and flavorful.