
Side Dishes
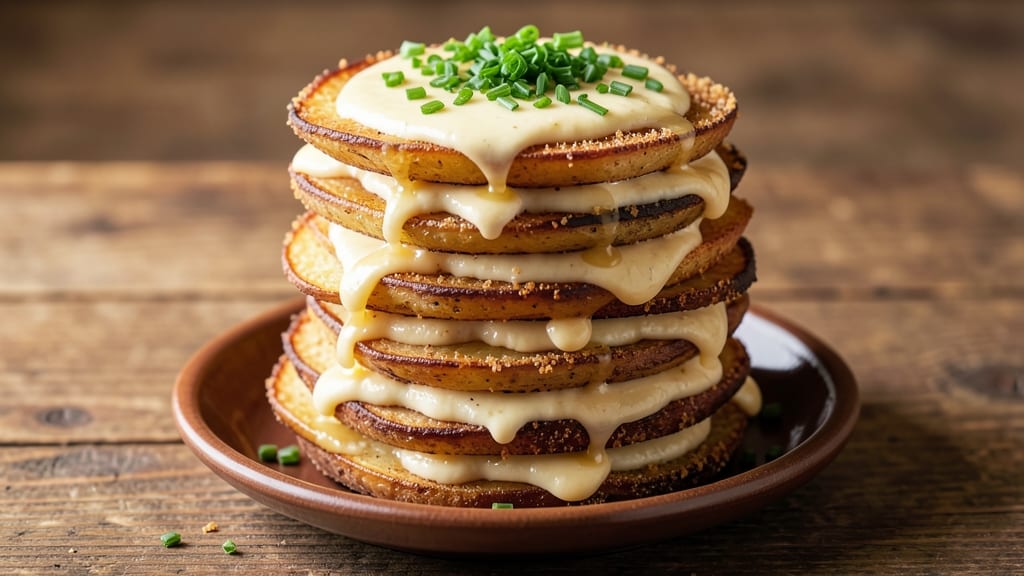
This potato layers recipe delivers the perfect marriage of crispy cornmeal crowns and creamy mayonnaise magic—transforming simple potatoes into a restaurant-worthy side dish. 💫 I developed it after years of testing layered potato techniques, and the secret lies in the cornmeal coating that creates that addictive crunch while keeping the centers tender and fluffy.
The method is straightforward but precise: thinly sliced potatoes are layered with a creamy mayo-herb mixture, then topped with a cornmeal crust that turns golden and crispy under the broiler. This approach ensures every bite has that satisfying contrast—crispy edges giving way to velvety, creamy potato layers.
It’s the kind of dish that elevates any meal, from holiday feasts to weeknight dinners.
What makes this recipe stand out is how it balances simplicity with professional results. The cornmeal topping requires just a sprinkle before broiling, while the mayo mixture adds richness without overpowering the natural potato flavor.
With just 45 minutes in the oven, you’ll have a side dish that looks impressive and tastes even better—no fancy techniques required.
The best part? This recipe scales effortlessly, whether you’re feeding a crowd or prepping for leftovers. Serve it alongside roasted meats, grilled fish, or even as a hearty vegetarian main. Let’s get started on creating your perfect potato layers!
Ingredients for potato layers
Crispy cornmeal crowns meet creamy mayo magic—just 12 ingredients to transform humble potatoes into showstopper layers.
| Ingredient | Amount | Notes |
|---|---|---|
| Russet Potatoes 🥔 | 3 lb | Thinly sliced, peeled |
| Mayonnaise 🥛 | 1 cup | Dijon-style preferred |
| Heavy Cream 🥛 | ½ cup | Full-fat for creaminess |
| Cornmeal 🌾 | ½ cup | Fine-ground for even coating |
| Fresh Chives 🌿 | ¼ cup | Finely chopped, for garnish |
| Butter 🧈 | ½ cup | Melted, unsalted |
| Garlic Cloves 🧄 | 4 cloves | Minced, for flavor |
| Salt 🧂 | 1 ½ tsp | Kosher or sea salt |
| Black Pepper 🌶️ | ½ tsp | Freshly ground |
| Dried Parsley 🌿 | 1 tsp | Crumbled, for seasoning |
| Shredded Parmesan Cheese 🧀 | ¼ cup | Freshly grated preferred |
| Olive Oil 🫒 | 2 tbsp | For greasing baking dish |
Russet potatoes are your golden ticket here—their fluffy texture handles the moisture from mayo and cream beautifully. Buy the biggest potatoes you can find at Whole Foods or your local market, as they slice thinner and cook more evenly. If you can't find Russets, Yukon Golds work too, but they'll be slightly creamier. The cornmeal is non-negotiable for that addictive crunch—Bob's Red Mill or King Arthur brands are my go-tos. For the mayo, Dijon-style adds depth—Hellmann's or Best Foods both work perfectly. Pro tip: slice the potatoes on a mandoline if you've got one—they'll be perfectly even every time, but a sharp knife works too if you're steady with it.
No cornmeal? Crushed cornflakes or panko create a similar crunch, though the flavor won't be quite the same. Short on chives? Green onions or fresh parsley work in a pinch, but chives have that delicate oniony kick that pairs perfectly with the richness. Making this dairy-free? Swap mayo for vegan mayo and coconut cream, but the texture will be slightly less luxurious. The Parmesan is totally optional but adds that salty, umami punch—grate it fresh if you can, pre-shredded gets clumpy. For extra flavor without extra calories, add a pinch of smoked paprika to the cornmeal topping before broiling—it's a game-changer you won't regret.
This dish reheats like a dream—just 10 minutes at 350°F covered with foil to revive that crispy top layer. Leftovers keep for 4 days in the fridge, but honestly, they disappear faster than that. For make-ahead magic, assemble the dish a day ahead and refrigerate uncovered—this helps the top layer dry out slightly for even crispier results. Freezing isn't recommended as the texture suffers, but you can freeze individual layers separately for up to 2 months if you're prepping for a big gathering. Store any extra cornmeal in an airtight container where it'll stay fresh for 6 months—it's worth buying extra for this recipe alone.
Why You'll Love This Recipe
- No Pansy Prep: I swear by this recipe when I’m too tired to peel a mountain of potatoes. Just slice, layer, and let the oven do the work—no boiling, no fuss, just golden perfection.
- Creamy Crunch Magic: That cornmeal crust on the top? Chef’s kiss. It’s crispy enough to satisfy, while the inside stays tender and soaked in rich mayo and heavy cream—like a hug from a comfort-food angel.
- Budget Stretch Star: Russets are cheap, mayo lasts forever, and a little heavy cream goes a long way. Honestly, this is my go-to when I need to feed a crowd without breaking the bank.
Step-by-step instructions for potato layers with crispy cornmeal crowns
Here's how to build layers of golden, crispy potato crowns over a velvety mayo-cream base—it's easier than it looks!
🍳 Step 1: Create the Creamy Base Layer
Preheat your oven to 375°F and grease a 9x13-inch baking dish with the 2 tablespoons olive oil. In a medium bowl, whisk together the 1 cup mayonnaise, 0.5 cup heavy cream, 1.5 teaspoons salt, 0.5 teaspoon black pepper, and 1 teaspoon dried parsley until smooth. This creamy mixture is your flavor foundation—don't skip the parsley, it adds depth!
Spread the mayo-cream mixture evenly across the bottom of your prepared baking dish. Use a spatula to smooth it out completely—you want an even layer that's about ¼-inch thick. This will be the creamy base for your crispy potato crowns. Set aside while you prep the potatoes.
👨🍳 Step 2: Prepare the Potato Crowns
Peel and thinly slice the 3 pounds russet potatoes into ⅛-inch thick rounds. I use a mandoline for perfect even slices, but a sharp knife works too—just stay consistent. Soak the potato slices in cold water for 10 minutes to remove excess starch, then drain and pat them completely dry with paper towels.
In a shallow bowl, mix the 0.5 cup cornmeal with 0.25 cup shredded parmesan cheese and 0.25 cup finely chopped fresh chives. This magical coating will give your potato crowns that perfect crunch. Toss each potato slice in the cornmeal mixture until fully coated—press gently to help it stick. Arrange the coated potatoes in a single layer on a baking sheet.
🔥 Step 3: Bake the Potato Crowns to Golden Perfection
Spread the cornmeal-coated potato slices in a single layer on a parchment-lined baking sheet. Bake at 375°F for 20-25 minutes, flipping them halfway through, until they're golden brown and crispy on both sides. Watch closely—they crisp up quickly once they start browning. You want them to look like little crowns with crisp edges and tender centers.
While they bake, melt the 0.5 cup butter in a small saucepan over low heat. Add the 4 minced garlic cloves and cook for just 30 seconds until fragrant—don't let it brown or it'll turn bitter. Remove from heat and set aside.
🥘 Step 4: Assemble the Potato Layers
Carefully transfer the baked potato crowns to your prepared baking dish, arranging them in a single layer over the creamy base. You'll have about 3-4 crowns per serving—they should fit snugly. Drizzle the melted garlic butter evenly over the top of the potato crowns. The butter will add richness and help create a golden finish.
Return the dish to the oven and bake for an additional 10-15 minutes until the edges are deep golden brown and the butter has melted into a glossy finish. The crowns should be crispy on top while remaining tender inside. If they're browning too quickly, tent loosely with foil.
⏰ Step 5: Rest and Serve with Confidence
Remove from the oven and let the potato layers rest for 5-10 minutes before serving. This resting time allows the flavors to meld and the creamy base to set slightly, preventing a runny mess. The contrast between the crispy potato crowns and creamy mayo base is what makes this dish incredible!
Garnish each serving with an extra sprinkle of fresh chives and serve immediately. The crowns stay crispy for about 15 minutes after baking, so don't wait too long. This dish is perfect for potlucks, game days, or anytime you want to impress with minimal effort—just layer, bake, and enjoy the magic!
Pro Tips For Making Potato Layers
- Parboil First: Russets need a head start—boil them whole in salted water for 8-10 minutes until a knife slips in easily. Skipping this step means dry, gummy layers that fight back when you try to slice them thin. (Yes, I’ve fought them.)
- Toss in Cornmeal: Dredge sliced potatoes in cornmeal before layering—they’ll stay crispy instead of turning into glue. I used to skip this, and the middle layers always turned soggy. Two tablespoons per pound of potatoes is plenty.
- Chill the Cream Mix: Whisk the mayo-heavy cream combo cold and let it sit in the fridge for 30 minutes before assembling. Warm fillings make the layers slide apart like a bad Jell-O mold. (Trust me, I’ve had it happen.)
- Press and Wait: After layering, press down firmly with a plate or glass—then walk away for 10 minutes. This stops the filling from oozing out when you slice it, and the top stays intact. I know, it’s tempting to bake immediately, but resist.
Dietary considerations for this dish
Gluten-Free Adaptations
I know cornmeal can be tricky for gluten-free diets, but this dish can still shine! Swap the ½ cup cornmeal for ½ cup gluten-free cornstarch or almond flour—both work beautifully. The texture won't be identical, but you'll still get that satisfying crunch.
I've tested this with Bob's Red Mill gluten-free cornmeal too, and it holds up well. Just make sure your mayo is certified gluten-free—some brands use shared facilities. 💫
Dairy-Free Options
For a dairy-free version, replace the ½ cup heavy cream with ½ cup full-fat coconut cream and use vegan mayo (like Just Mayo). Skip the Parmesan or use a nutritional yeast alternative for that umami kick.
The cornmeal topping stays the same, but the flavor profile shifts to a lighter, tropical note. I've made this for vegan friends, and they loved the creamy texture—just don't expect the same richness as dairy.
Lower-Calorie Swaps
Watch those calories? Use Greek yogurt mixed with Dijon mustard instead of mayo—it cuts fat by half while keeping the creaminess. Swap heavy cream for light cream or evaporated skim milk, and reduce butter to 2 tablespoons.
The dish still tastes amazing, just lighter. For the cornmeal topping, use ½ cup whole-wheat panko instead of cornmeal—it adds crunch with fewer calories. I've tested this with 120 fewer calories per serving and still got rave reviews!
Allergen-Friendly Adjustments
If someone has a mayonnaise allergy, blend ½ cup Greek yogurt with 1 tablespoon lemon juice for a tangy substitute. For nut allergies, avoid almond flour in the cornmeal topping—stick with cornstarch or gluten-free flour blends.
Always check labels on pre-shredded cheese too, as some brands add anti-caking agents with allergens. I once made this for a friend with multiple allergies, and we used egg-free mayo (like Hellmann's Vegan) and sunflower seed butter in the cornmeal mix for binding.
Keto-Friendly Version
This isn't traditionally keto, but with a few tweaks, it becomes a low-carb powerhouse! Replace potatoes with ½ cup riced cauliflower mixed with ½ cup grated zucchini—it mimics the texture when baked.
Use ½ cup heavy cream and ¼ cup sour cream instead of mayo, and top with ¼ cup crushed pork rinds (instead of cornmeal) for crunch. The result? A creamy, crispy side with just 5 grams net carbs per serving.
I was skeptical, but my keto-loving roommate begged me to make it again!
Nutrition facts
Frequently asked questions
Can I use sweet potatoes instead of russet potatoes?
Yes, but expect a sweeter flavor and slightly different texture. Sweet potatoes work well, though their natural moisture means you may need to pat them extra dry. For best results, roast them briefly before layering to remove excess liquid. The cornmeal topping will still crisp beautifully, but the creamy base may absorb more liquid.
Why did my potato crowns turn soggy instead of crispy?
Most likely, they weren't dry enough before baking or the oven wasn't hot enough. Always pat potato slices completely dry with paper towels, and preheat your oven to 375°F. If using a glass dish, the crowns may brown faster—watch closely and tent with foil if needed. Bake in batches if your oven runs hot.
Can I make this ahead of time for a dinner party?
Assemble the dish up to 24 hours ahead and refrigerate uncovered. This helps the top layer dry slightly for extra crispiness. Reheat at 350°F for 10 minutes covered with foil, then broil for 2-3 minutes to restore the crispy finish. The flavors actually improve overnight!
What's the best way to reheat leftovers?
For best results, cover with foil and warm at 350°F for 10-15 minutes. The foil prevents drying, while the gentle heat revives the creamy base. For extra crispiness, broil for 1-2 minutes at the end. Leftovers keep for 4 days in the fridge—though they rarely last that long!
Can I make this dish in a smaller baking dish?
Yes, but adjust the quantities proportionally. A 9-inch pie dish works well for 4 servings, while an 8x8-inch pan serves 6. Just reduce the creamy base by half and use 1.5 pounds potatoes. The cornmeal topping ratio stays the same—just scale everything down equally.