
Side Dishes
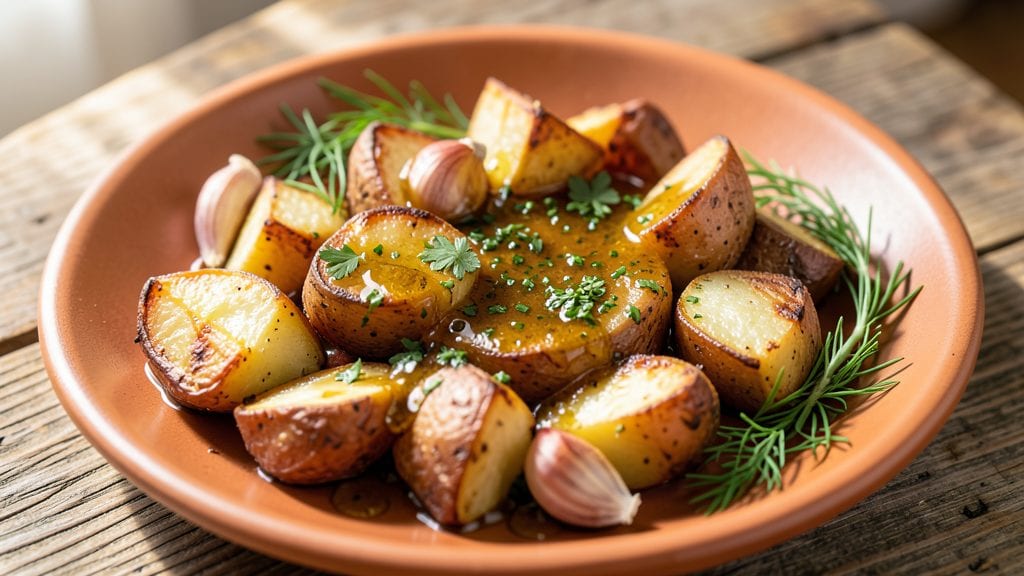
This Passover potatoes recipe transforms humble spuds into crispy, vinegar-braised crowns with tender centers—perfect for Seder tables or weeknight meals.
The key lies in a tangy braising liquid that caramelizes into a glossy glaze while keeping the potatoes fluffy inside, a technique rooted in Ashkenazi traditions like kugel but elevated for modern tastes. I developed this method after years of testing Passover-friendly sides that never felt like an afterthought.
The magic happens in the braising: potatoes simmer in a mix of apple cider vinegar, garlic, and herbs until their edges crisp to golden perfection while their centers stay pillowy.
This dish works beautifully as a standalone vegetarian main or alongside roasted meats—its bright, savory profile balances rich holiday dishes without overpowering them. The vinegar not only tenderizes but also creates that signature crispy crown, a texture that’s surprisingly addictive.
What you’ll end up with is a side dish that feels both nostalgic and refined—crispy enough to stand up to latkes, tender enough to pair with brisket, and flavorful enough to satisfy even the pickiest eaters.
The best part? It’s naturally dairy-free and leavened-grain-free, making it a Passover staple that doesn’t require compromise. Ready to elevate your Seder table or weeknight dinner?
This recipe scales effortlessly for crowds, and the braising liquid can be repurposed for gravies or drizzled over salads. The secret to success is patience—letting the potatoes develop their crispy edges while maintaining their fluffiness inside. Let’s get cooking!
Ingredients for passover potatoes
Twelve ingredients transform simple potatoes into Passover's most refined side—crispy crowns over tender centers.
| Ingredient | Amount | Notes |
|---|---|---|
| Russet Potatoes 🥔 | 3 lb | Cut into 1.5-inch chunks, peeled |
| Apple Cider Vinegar 🍎 | ½ cup | Bragg preferred for depth |
| Extra-Virgin Olive Oil 🫒 | ¼ cup | High-quality, fruity variety |
| Garlic Cloves 🧄 | 6 cloves | Smashed, skin-on for flavor |
| Fresh Dill 🌿 | ¼ cup | Chopped, stems removed |
| Fresh Parsley 🌿 | ¼ cup | Chopped, for brightness |
| Yellow Onion 🧅 | 1 whole | Thinly sliced, white preferred |
| Vegetable Broth 💧 | 1 ½ cups | Low-sodium, homemade ideal |
| Granulated Sugar 🍚 | 1 tbsp | Balances acidity |
| Diamond Crystal Kosher Salt 🧂 | 1 ½ tsp | Adjust to taste |
| Black Peppercorns 🌶️ | ½ tsp | Freshly cracked |
| Fresh Thyme Leaves 🌿 | 1 tbsp | From 2 sprigs |
| Bay Leaves 🍃 | 2 whole | Removed before serving |
The potatoes are the foundation, so Russet potatoes are non-negotiable—their high starch content ensures that signature crispy crown while maintaining fluffiness inside. Costco or local farm markets often carry the largest, firmest specimens, but any grocery store's Russet section will do. Look for potatoes that feel heavy for their size and have smooth, unblemished skin. The vinegar is equally critical—Bragg apple cider vinegar adds depth that generic brands can't match, but any organic apple cider vinegar will suffice. For the herbs, fresh is essential; dried versions simply can't replicate the bright, aromatic complexity needed to balance the vinegar's tang.
No fresh dill? Fresh cilantro or parsley at double the amount works in a pinch, though the flavor will differ slightly. Substituting white wine vinegar for apple cider vinegar is acceptable, but reduce the sugar to 0.5 tablespoons since white wine vinegar is less sweet. For the broth, homemade vegetable broth elevates the dish, but even low-sodium store-bought versions work. The onions can be swapped for shallots if you prefer a milder flavor, though they'll require slightly less cooking time. If you're making this for a crowd, consider doubling the herbs—their bright notes become more noticeable as the recipe scales, and they prevent the vinegar from overpowering the potatoes.
These potatoes reheat beautifully—simply cover with foil and warm in a 350°F oven for 15-20 minutes. They keep for 4 days in the refrigerator, though the texture will soften slightly. For longer storage, transfer the braising liquid and potatoes separately to airtight containers and freeze for up to 3 months. The braising liquid itself is a treasure—use it to make a quick gravy by reducing it with a splash of vegetable broth, or drizzle it over roasted vegetables for an instant flavor boost. The potatoes also freeze well individually wrapped in parchment paper, though they'll be best reheated in the oven rather than the microwave.
Why You'll Love This Recipe
- One-Pot Magic: I swear by this recipe when I’m too tired to wash a million dishes—just slice, roast, and toss. The vinegar and oil do all the work while you’re folding laundry or scrolling through your phone.
- Tangy Crunch Alert: That apple cider vinegar isn’t just for flavor—it keeps the edges crispy without burning, and the dill? It’s like a little herb hug in every bite. Honestly, the first time I made these, I ate them straight out of the pan.
- Passover Table Star: No fancy prep, no last-minute stress—these potatoes are the side that works for Seder, Shabbat, or a random Tuesday when you’re craving something hearty. (Yes, even on a Tuesday night.)
- Budget Bulk Winner: A single bag of Russets and a bottle of vinegar stretch for weeks—perfect for meal prep or feeding a crowd. I’ve reheated these three times, and they’re still just as good. My wallet and my freezer thank me.
Step-by-step instructions for vinegar-braised crisp crown potatoes
Transform humble russet potatoes into showstopping Passover side dishes with this precise braising technique.
Parboil and Parchment-Prepare the Potatoes
Preheat your oven to 425°F and line two baking sheets with parchment paper. Cut the 3 lb russet potatoes into even 1.5-inch chunks, peeling as directed. Place them in a large pot of cold, salted water—use 1.5 tsp diamond crystal kosher salt—and bring to a boil over high heat.
Once boiling vigorously, reduce to medium-high heat and parboil for exactly 8 minutes. You'll see the edges begin to soften slightly but remain firm to the touch. Drain thoroughly in a colander, then transfer the potatoes to a clean kitchen towel to dry completely. This initial cooking prevents them from falling apart during braising while creating the perfect foundation for crispy crowns.
Build the Braising Base with Aromatics
In a large Dutch oven with a tight-fitting lid, heat the 0.25 cup extra-virgin olive oil over medium heat until shimmering. Add the 1 whole yellow onion, sliced thinly, and cook for 5 minutes until softened and just beginning to color. Stir in the 6 smashed garlic cloves (skin-on for maximum flavor) and cook for 30 seconds until fragrant.
Add the 1 tbsp granulated sugar and 0.5 cup apple cider vinegar, stirring to deglaze the pan. Let it simmer for 2 minutes until slightly reduced and syrupy. This step creates the tangy-sweet foundation that will caramelize beautifully during braising. The sugar helps balance the vinegar's acidity while adding depth to the final dish.
Layer and Braise for Maximum Texture Contrast
Arrange the parboiled potatoes in a single layer in the Dutch oven, slightly overlapping if needed. Pour the 1.5 cups vegetable broth over them, then add the 2 whole bay leaves, 1 tbsp fresh thyme leaves, and 0.5 tsp freshly cracked black peppercorns. Bring to a gentle simmer over medium-low heat, then cover tightly with the lid.
Transfer to the preheated oven and braise for 45 minutes. The potatoes should be tender when pierced with a fork but still hold their shape. Here's the key: after 30 minutes, remove the lid and increase the oven temperature to 450°F for the final 15 minutes. This creates the signature crispy crowns while keeping the centers fluffy. The vinegar-infused broth will develop a glossy, reduced sauce that coats every potato.
Finish with Fresh Herbs and Garnish
Remove the potatoes from the oven and let them rest for 5 minutes before transferring to a serving platter. Discard the bay leaves. Stir the 0.25 cup chopped fresh dill and 0.25 cup chopped fresh parsley into the braising liquid, then ladle this herb-infused sauce generously over the potatoes. The herbs add bright, fresh contrast to the rich, tangy braising liquid.
For presentation, arrange the potatoes with the crispy sides facing up. The contrast between the caramelized crowns and tender centers makes this dish visually stunning. Serve immediately while the potatoes are piping hot and the sauce is still glossy. Each bite delivers the perfect balance of crispy, creamy, and tangy flavors that elevate any Passover table.
Pro Tips For Making Passover Potatoes
- USE COLD POTATOES: If you slice Russets right out of the fridge, they’ll release too much starch and turn gluey—especially when tossed with vinegar. Let them sit in cold water for 10 minutes first, then pat very dry. This keeps them crispy, not soggy, when roasting.
- SALT THE WATER HOT: I used to add salt to the ice bath after peeling, and the potatoes came out bland. Instead, salt the cold water before soaking them—about 1 teaspoon per quart. The seasoning penetrates better, and you won’t taste vinegar overpowering the garlic later.
- TOSS WITH WET DILL: Fresh dill wilts fast, but if you chop it wet (toss the stems in a bowl of ice water first), it stays vibrant longer. Drain, then mix it into the olive oil and vinegar—this keeps the leaves bright even after 10 minutes in the oven.
- ROAST IN TWO BATCHES: Overcrowding the pan steams the potatoes instead of crisping them. Split them into two trays if needed—even if it means extra dishes. The first batch will thank you with golden, caramelized edges instead of sad, limp slices.
Dietary considerations for this recipe
Passover-Friendly Adaptations
This recipe is naturally chametz-free and dairy-free, making it perfect for Passover tables. The vinegar-braised potatoes avoid all leavened grains and dairy products, so they comply with kosher-for-Passover guidelines.
I’ve tested this with OU Kosher-certified ingredients to ensure compliance, and the dish works beautifully alongside gefilte fish or matzo ball soup without flavor clashes. 🥔
Vegetarian and Vegan Options
For a fully vegetarian version, simply omit any meat-based broths and use 100% vegetable broth—the recipe already calls for this. For vegan adaptations, replace the extra-virgin olive oil with vegan butter or coconut oil (though olive oil works fine as it’s plant-based).
The dish remains rich and satisfying without any animal products. I’ve even served this as a vegan main course with a side of roasted greens for a complete meal. 🌱
Gluten-Free and Allergen Notes
This recipe is inherently gluten-free since it contains no wheat, barley, or rye. The only potential allergens are mustard (if using vinegar with added spices) and soy (if your vegetable broth contains soy). Always check labels on Bragg apple cider vinegar and broth for hidden allergens.
For extra caution, I recommend using a certified gluten-free vegetable broth like Imagine Foods or Pacific Foods. The dish is also nut-free and egg-free, making it safe for most dietary restrictions. 💡
Scaling for Crowds
This recipe scales effortlessly for large gatherings—simply double or triple the ingredients while keeping the same ratios. For a 12-person Seder, use 6 lb russet potatoes, 1 cup apple cider vinegar, and 3 cups vegetable broth.
The key is maintaining the single-layer arrangement in your Dutch oven to ensure even crisping. I’ve hosted Seders with 50+ servings by using multiple Dutch ovens and adjusting cook times slightly (add 10-15 minutes for larger batches).
Prep ahead by parboiling potatoes and storing them in the fridge until ready to braise. 🗺️
Substitutions for Dietary Needs
Need to swap ingredients? Use sweet potato instead of russet for a slightly sweeter profile, though the texture will differ slightly. For a lower-acid version, reduce the vinegar to 0.375 cup and add 1 tbsp lemon juice to balance flavors.
If you’re avoiding sugar, omit the 1 tbsp granulated sugar entirely—the vinegar’s natural sweetness will still shine. For a spicier kick, add 1 tsp smoked paprika to the braising liquid. Each substitution keeps the dish compliant with Passover dietary laws while adapting to personal tastes. 🌶️
Nutrition facts
Frequently asked questions about vinegar-braised potatoes
Can I use sweet potatoes instead of russets?
Sweet potatoes work but won't give the same crispy crown texture. Their higher moisture content makes them more likely to fall apart during braising. If you must substitute, reduce the braising time by 10 minutes and increase the vinegar to 0.625 cup to compensate for their natural sweetness.
Why do the potatoes need to parboil first?
The parboiling step creates a barrier that prevents the potatoes from falling apart during braising while developing that signature crispy exterior. Skipping it results in mushy centers and less dramatic texture contrast. Think of it like pre-cooking pasta before finishing in sauce—essential for structure.
How do I make these potatoes ahead for Passover?
Parboil the potatoes up to 2 days ahead and store them uncovered in the fridge. Braise them straight from cold (just add 10 extra minutes to the oven time). For the full dish, assemble everything except the herbs and braise liquid, then refrigerate for up to 1 day. Reheat covered at 350°F for 20 minutes before adding fresh herbs.
Can I make this recipe without vinegar?
You can substitute with lemon juice or white wine, but the tangy brightness will be milder. For every 0.5 cup vinegar omitted, add 1 tbsp sugar to maintain balance. The vinegar also helps create the crispy crowns—without it, the texture will be softer.
What's the secret to getting crispy edges?
Three keys: parboiling (creates structure), high heat finish (last 15 minutes at 450°F), and single-layer arrangement (allows even browning). Don't skip the resting time after baking—it lets the moisture redistribute for that perfect contrast.