
Side Dishes
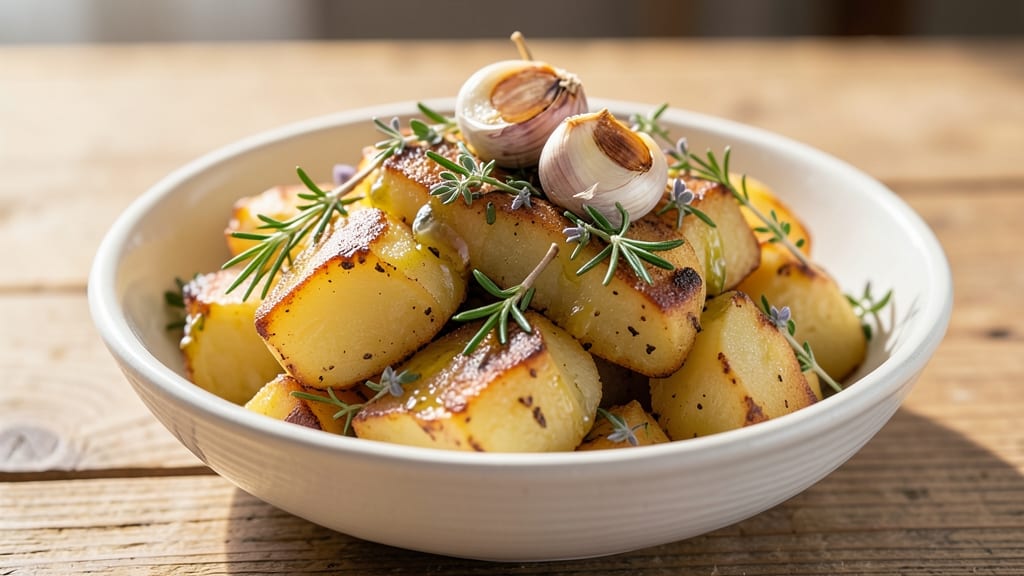
Transforming canned diced potatoes into a crispy, restaurant-worthy side dish is easier than you think—this one-pan garlic-herb roast delivers golden edges and tender centers with minimal effort.
I developed this recipe after realizing how versatile canned potatoes can be when given proper attention, and it’s become a staple in my weeknight rotation. The secret lies in the right balance of oil, herbs, and high-heat roasting to create that coveted texture without soggy interiors.
What sets this recipe apart is its simplicity: just five key ingredients come together in 30 minutes to create a dish that’s crispy on the outside and perfectly tender inside.
The garlic-herb combination adds depth without overpowering the potatoes, while the one-pan method means less cleanup and more time enjoying your meal. This is the kind of side dish that elevates any main course—whether it’s grilled chicken, steak, or even a hearty vegetarian plate.
The result is a golden, crispy roast with edges that crackle at every bite and a flavor profile that’s rich yet balanced. The aroma alone will have everyone at the table asking for seconds, and the best part?
You can customize it with your favorite herbs or spices to suit any taste. This recipe proves that canned potatoes aren’t just a convenience—they’re a canvas for flavor.
Perfect for busy weeknights, meal prep, or even holiday gatherings, this dish is foolproof and adaptable. Whether you’re feeding a family or just treating yourself, the crispy edges and herby aroma make it a standout. Let’s get started on creating this crispy, flavorful roast that’s sure to impress.
Ingredients for canned diced potatoes
Five simple ingredients transform canned potatoes into a crispy, aromatic side dish worth celebrating.
| Ingredient | Amount | Notes |
|---|---|---|
| Canned Diced Potatoes 🥔 | 2 cups | Drained, not rinsed |
| Extra-Virgin Olive Oil 🫒 | 2 tbsp | High-quality, fruity variety |
| Garlic Cloves 🧄 | 4 cloves | Minced, fresh preferred |
| Fresh Rosemary 🌿 | 1 tbsp | Finely chopped, stems removed |
| Fresh Thyme Leaves 🌿 | 1 tbsp | Or 1 tsp dried thyme |
| Diamond Crystal Kosher Salt 🧂 | ½ tsp | Fine grain preferred |
| Freshly Ground Black Pepper 🌶️ | ¼ tsp | Coarse grind preferred |
The potatoes are the star, but the olive oil makes all the difference. Use a high-quality extra-virgin—the fruity notes complement the garlic beautifully. I grab mine from Trader Joe's or Whole Foods; the California Early Harvest variety has the best flavor. Fresh garlic cloves (not the jarred minced stuff) give the most flavor—roast them first if you're feeling fancy, but mincing works just fine. The herbs? Fresh is ideal, but dried thyme at one-third the amount works in a pinch. Just make sure your rosemary isn't woody—it should snap easily when you bend the stems.
No fresh rosemary? Dried rosemary at half the amount gets you close, but it lacks that bright aroma. Short on thyme? Oregano or basil both work, though the flavor profile shifts slightly. The olive oil can be swapped for avocado oil if you prefer a neutral taste, but it won't have the same fruity depth. For extra crispiness, toss the potatoes with an additional 1 tbsp cornstarch before roasting. And if you're serving this with something rich like steak, don't skip the black pepper—it cuts through the fat beautifully.
These potatoes reheat like a dream—toss them back in the oven at 400°F for 5-7 minutes until crispy again. Store leftovers in an airtight container for up to 3 days, but honestly, they disappear faster than that. For meal prep, portion them into small glass containers so they stay crispy longer. The aroma alone will have everyone heading to the kitchen, so make extra if you're feeding a crowd.
Why You'll Love This Recipe
- Here’s what sold me: the edges get this golden, almost papery crisp while the centers stay tender. Drizzle with that good olive oil, add the minced garlic, and a sprinkle of thyme—suddenly, it’s restaurant-quality without the fuss. My husband steals the pan before I even finish plating.
- Open Pantry Magic: I swear by this one when I’m staring into my fridge at 6:30 PM with nothing but a can of potatoes and a handful of herbs. No chopping, no peeling—just drain, toss, and roast. That’s it. The canned potatoes handle the work while you focus on the garlic and rosemary, which infuse in minutes.
- Crispy-Creamy Perfection: Here’s what sold me: the edges get this golden, almost papery crisp while the centers stay tender. Drizzle with that good olive oil, add the minced garlic, and a sprinkle of thyme—suddenly, it’s restaurant-quality without the fuss. My husband steals the pan before I even finish plating.
- Weeknight to Potluck Hero: Between us, this is my go-to for lazy dinners and holiday sides. Serve it warm over a simple salad for a no-stress weeknight, or double the batch for a potluck where no one will guess it’s canned. The rosemary and thyme make it feel special, even when it’s just potatoes.
Step-by-step instructions for one-pan garlic-herb roasted potatoes
Here's how to transform simple canned potatoes into a restaurant-worthy side dish with irresistible crispy edges.
Prep the Potatoes and Herbs for Maximum Flavor
Drain the 2 cups canned diced potatoes thoroughly but don't rinse them—the starch on their surface helps create that golden crust. Spread them on a clean kitchen towel and pat dry with another towel. You want them as dry as possible for crispy edges, but don't press too hard or you'll crush the pieces.
While the potatoes dry, prepare the herbs by finely chopping the 1 tablespoon fresh rosemary and 1 tablespoon fresh thyme leaves. Remove any woody stems from the rosemary—just the needle-like leaves will give you that aromatic punch. I like to use my fingers to pluck the leaves off the stems rather than chopping them, as it gives a more delicate texture that distributes evenly throughout the dish.
Create the Herb Oil Base for Deep Flavor Infusion
In a large oven-safe skillet with a lid (I prefer cast iron for even heat distribution), heat the 2 tablespoons extra-virgin olive oil over medium heat until shimmering but not smoking. Add the 4 minced garlic cloves and sauté for 30 seconds until they're fragrant but not browned—this prevents bitterness. Immediately remove the pan from heat and stir in the chopped rosemary and thyme leaves.
Let the herb oil mixture cool for 2 minutes while you return the pan to medium heat. This brief cooling period allows the volatile oils in the garlic to mellow slightly, preventing any harsh flavors from overpowering your dish. The herbs will release their essential oils into the oil, creating a fragrant base that will permeate every potato piece.
Roast Until Crispy Edges Form
Add the prepared potatoes to the skillet and gently toss to coat them evenly in the herb oil. Sprinkle with the 0.5 teaspoon diamond crystal kosher salt and 0.25 teaspoon freshly ground black pepper, pressing lightly to help the seasoning adhere. Increase the heat to medium-high and cook for 5 minutes without stirring, allowing the potatoes to develop a crust on one side.
After 5 minutes, give the potatoes a gentle toss and reduce heat to medium. Cover the skillet with a lid and cook for an additional 10 minutes. The lid creates a steam environment that helps cook the potatoes through while the uncovered periods allow moisture to escape, creating those coveted crispy edges. You'll know they're ready when the potatoes are tender when pierced with a fork and the edges are deep golden brown.
Finish with High Heat for Maximum Crispiness
Remove the lid and increase the heat to medium-high for the final 2-3 minutes. This last step is crucial for achieving that perfect crispy texture. Watch the potatoes closely—they'll go from tender to perfectly crispy in just minutes. You're looking for edges that are deep golden brown with some areas developing a slight char, while the centers remain fluffy and tender.
Taste one of the potatoes and adjust seasoning if needed. The crispy edges should have a satisfying crunch while the interior remains soft and fluffy. If you find any pieces that aren't crispy enough, return them to the pan for another 30 seconds to 1 minute until they reach your desired texture. Serve immediately while the edges are at their crispest, and enjoy the symphony of garlic, herbs, and that satisfying crunch with every bite.
Pro Tips For Making Canned Diced Potatoes
- DRAIN AND RINSE FIRST: Canned potatoes come packed in liquid—skip rinsing, and your dish will taste like a watered-down soup. Drain them, then give them a quick cold-water rinse to cut the starchiness. (Yes, even if the label says "ready to eat.")
- TOAST THE GARLIC LOW: I used to burn the garlic every time, turning the whole dish bitter. Sauté those cloves in olive oil on medium-low until they’re golden but not crispy—about 3-4 minutes. If they smell like heaven, you’re golden.
- CHOP HERBS FINE: Whole rosemary sprigs and thyme stems look pretty but don’t infuse flavor. Use a knife to smash the rosemary needles and finely chop the thyme leaves—this releases their oils and makes every bite taste like you slaved over it.
- SALT THE POTATOES MIDWAY: Canned potatoes absorb oil and herbs better when they’ve had a chance to warm up. Toss them with garlic and herbs first, then add salt after they’ve simmered for 2-3 minutes. This keeps them from turning mushy.
Essential equipment for great canned diced potatoes
Cast Iron Skillet
I can't emphasize enough how much a 10-inch Lodge cast iron skillet changes the game for this recipe. Cast iron retains and distributes heat perfectly, ensuring even browning and crispy edges without hot spots.
The heavy material also helps maintain consistent temperature during the cooking process, which is crucial when you're working with delicate canned potatoes that can easily turn mushy. 🔥
If you don't own cast iron, a stainless steel skillet with a heavy bottom (like All-Clad) works well too. Just be prepared for slightly less even browning. For non-stick alternatives, I recommend a high-quality ceramic-coated pan—just avoid cheap non-stick coatings that can release harmful fumes at high heat.
The key is choosing a pan with a lid that fits snugly to trap steam during the cooking process.
Oven-Safe Skillet
Since we're finishing this dish on the stovetop but want that oven-baked texture, an oven-safe skillet is essential. Most cast iron and stainless steel pans can handle oven temperatures up to 500°F, which is perfect for this recipe.
If your pan isn't oven-safe, transfer the potatoes to a baking sheet for the final crisping phase at 425°F for 5-7 minutes.
For those with limited counter space, consider a multi-functional pan like the Le Creuset Stoneware Skillet—it's oven-safe, dishwasher-safe, and adds a beautiful presentation to your table. The stoneware material also helps create that perfect crispy crust while keeping the interior tender.
Just be mindful that stoneware takes longer to heat up than metal pans.
Tongs for Tossing
A good pair of long-handled tongs makes all the difference when tossing the potatoes without crushing them. I use OXO Good Grips because the silicone tips protect both the potatoes and your fingers from the hot pan.
The long handles keep your hands safe from the heat while you work. Avoid metal tongs with sharp edges—they can tear the potatoes and make them less appealing.
For the final crisping stage, I recommend using heat-resistant silicone spatulas to gently nudge any stubborn pieces toward the heat source. The flexibility of silicone helps lift the potatoes without damaging their crispy edges.
If you don't have silicone tools, a wooden spoon works in a pinch, but it won't be as effective at high heat.
Measuring Tools
Precision matters when working with canned potatoes—they absorb flavors quickly, and too much or too little seasoning can make or break the dish. A stainless steel measuring cup and spoon ensure accurate measurements, especially for the olive oil and herbs.
I like the OXO Good Grips set because the non-slip handles make measuring effortless while cooking.
For the fresh herbs, a microplane grater works wonders for creating fine, even textures without chopping. If you're using dried herbs, a small spoon with a fine edge helps distribute them evenly.
And for the garlic, a garlic press saves time while ensuring consistent mincing—just don't over-press or you'll get bitter garlic juice.
Thermometer for Perfection
While this recipe doesn't require precise temperatures, a kitchen thermometer helps you monitor the pan's heat. I use an infrared thermometer to check the pan's surface temperature—keeping it between 375-400°F ensures even cooking without burning.
For the potatoes, a simple instant-read thermometer lets you check their internal temperature—aim for 205°F for tender, fluffy centers.
If you're new to thermometers, start with an instant-read model like the Thermoworks Thermapen ONE—it's affordable, accurate, and easy to use. For those who want to go pro, a dual-probe thermometer (like the Meater) lets you monitor both the pan and potatoes simultaneously.
The key is avoiding overcooking—the potatoes should be tender but still hold their shape when pierced.
Nutrition facts
Frequently asked questions
Can I substitute fresh potatoes for canned diced potatoes in this recipe?
While you can use fresh potatoes, the texture and cooking time will differ significantly. Fresh potatoes need to be diced into ½-inch pieces and parboiled for 5 minutes before roasting. They'll take 20-25 minutes total to achieve crispy edges, compared to the 15-20 minutes for canned potatoes. The key is ensuring they're fully dry before roasting—pat them thoroughly with a paper towel.
Why do my canned potatoes turn out soggy instead of crispy?
Soggy potatoes usually mean too much moisture or insufficient heat. Always pat the drained potatoes very dry before roasting—even a little excess liquid will prevent crispiness. Also, make sure your pan is hot enough (medium-high heat) and don't cover the skillet too early. The final 2-3 minutes of uncovered high heat are critical for crispy edges.
How can I make this recipe vegetarian or vegan?
This recipe is already vegetarian-friendly! For a vegan version, simply ensure your olive oil is certified vegan (most are) and verify that your rosemary and thyme are grown without animal products. No other substitutions are needed—the garlic-herb flavor profile works perfectly in plant-based meals. Serve with vegan butter or nutritional yeast for extra richness.
Can I make this ahead of time or should it be served fresh?
While these potatoes are best served immediately for maximum crispiness, you can prep them ahead. Roast them 10 minutes less than directed, then store in an airtight container. Reheat in the oven at 425°F for 5-7 minutes until crispy again. For meal prep, portion into small containers—they'll stay crispier longer than in a large container.
What other herbs or seasonings would work well with these potatoes?
This recipe is highly customizable! Try Italian seasoning for a Mediterranean twist, smoked paprika for a BBQ-inspired flavor, or lemon zest for brightness. For extra richness, add 1 tbsp grated Parmesan cheese during the final crisping stage. Just remember: fresh herbs generally give the best flavor, but dried herbs work in a pinch (use half the amount).