
Side Dishes
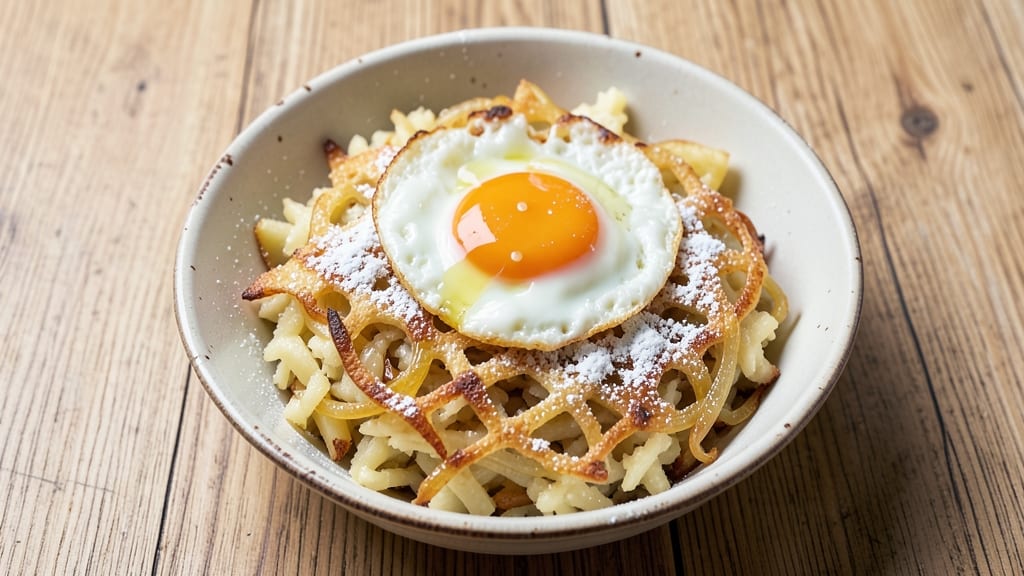
This Russian potato recipe transforms humble spuds into crisp golden crowns with tender, buttery hearts—draniki that taste like home. The secret lies in the vinegar kiss that creates that signature crunch while keeping the insides impossibly soft.
I first discovered this dish during a winter trip to Moscow, where it became a staple at every family table I visited.
The beauty of draniki is in their simplicity: grated potatoes mixed with egg, onions, and just enough seasoning to let the potatoes shine. The key technique is frying in batches at the right temperature—too hot and they burn, too cool and they soak up oil.
But once you get it right, you'll have restaurant-quality crispiness with minimal effort.
What makes these potatoes truly special is the contrast between the crispy exterior and tender interior, all while maintaining that authentic Russian flavor profile. The vinegar not only enhances the crispiness but also balances the richness of the butter.
Serve them with a dollop of sour cream or a simple dill sauce for the full experience.
Perfect as a side for hearty beef dishes or as a standalone appetizer, these draniki are a testament to how simple ingredients can create something extraordinary. The technique is straightforward, but the results are undeniably impressive—every bite delivers that satisfying crunch followed by a melt-in-your-mouth center.
Ingredients for russian potato
Eight simple ingredients transform cold potatoes into golden, vinegar-kissed draniki with crispy crowns.
| Ingredient | Amount | Notes |
|---|---|---|
| Russet Potatoes 🥔 | 3 lb | Cold, peeled, grated finely |
| Yellow Onion 🧅 | 1 medium | Finely grated, about 1 cup |
| Large Eggs 🥚 | 2 whole | Room temperature, beaten |
| All-Purpose Flour 🌾 | ¼ cup | For binding potato mixture |
| White Vinegar 💧 | 1 tbsp | For crispiness and tang |
| Salt 🧂 | 1 tsp | Kosher or sea salt |
| Black Pepper 🌶️ | ½ tsp | Freshly ground preferred |
| Unsalted Butter 🧈 | ½ cup | Melted for frying |
| Vegetable Oil 🫒 | 1 ½ cups | For deep frying, high smoke point |
| Fresh Dill 🌿 | ¼ cup | Chopped, optional garnish |
| Sour Cream 🥛 | ½ cup | For serving, optional |
The potatoes are everything here—Russet is ideal because it stays starchy and grates smoothly. Buy a 3-pound bag and grate them right after peeling while still cold (warm potatoes turn mushy). Most grocery stores carry Russets year-round, but if you're in a pinch, Yukon Golds work too. The onion adds sweetness that balances the vinegar's tang—yellow is traditional, but red would give a pretty pink hue. I always grab a big onion and grate it with the potatoes to save time. Freshly grated is key here—no pre-shredded stuff.
No white vinegar? Apple cider vinegar or lemon juice works in a pinch, but the flavor won't be identical. The flour might seem odd, but it's what makes these hold together—all-purpose is fine, but bread flour adds extra crispiness if you're feeling fancy. Short on butter? Lard or shortening keeps the same texture, though the flavor won't be as rich. The dill is totally optional, but it's the perfect garnish if you've got it—fresh is best, but dried works at one-third the amount. For the oil, vegetable or canola works perfectly, but stay away from olive oil—it burns too easily.
The grated potato mixture keeps best in the fridge for 24 hours if you're prepping ahead. Cover it tightly with plastic wrap pressed right onto the surface to prevent browning. These fry best fresh, but you can reheat leftovers in a 350°F oven for 10-15 minutes to restore some crispiness. Store fried draniki in an airtight container for 3-4 days—they're even better the next day when the flavors meld. Freeze uncooked potato mixture for up to 3 months—just fry from frozen, adding 1-2 extra minutes per batch.
Why You'll Love This Recipe
- One-Pot Wonder: I swear by this for lazy nights—just dice potatoes, slice onions, and toss in a pan. No chopping boards to wash, no extra bowls, just golden bites waiting.
- Crispy-Creamy Magic: That vinegar bath? It’s the secret—tender inside, shatteringly crisp edges, with eggs binding it all like a hug. Honestly, the first bite makes you forget it’s "just potatoes."
- Leftover Reinvention: Turn tomorrow’s lunch into today’s dinner. Cold slices reheat like a dream (or eat them straight from the fridge—no judgment). My kids beg for seconds when I pack these for school.
- Budget Breakthrough: Russets and eggs won’t break the bank, and a single batch feeds four for under $5. Between us, this is how I stretch grocery money without sacrificing flavor—no sad leftovers here.
Instructions for vinegar-kissed crisp crowns over buttery hearts
This Russian-inspired potato dish delivers a perfect balance of crispy golden tops and tender, buttery centers.
Prepare the Potato and Onion Mixture
In a large mixing bowl, combine the 3 lb of cold, peeled, finely grated russet potatoes and 1 medium finely grated yellow onion. The potatoes should be cold to prevent premature browning and maintain texture. Use your hands to work the mixture gently, squeezing out any excess moisture with a clean kitchen towel or paper towels. This step is crucial for crispy frying later.
In a separate bowl, whisk together the 2 whole room-temperature large eggs, 0.25 cup all-purpose flour, 1 tbsp white vinegar, 1 tsp salt, and 0.5 tsp black pepper. The vinegar adds tang and helps create that signature crispy exterior. Slowly pour the wet ingredients into the potato mixture, folding gently with a silicone spatula until just combined. Don't overmix—you want to preserve the potato's natural texture. Let the batter rest for 10 minutes while you prepare the frying station.
Fry the Potato Crowns to Golden Perfection
In a deep skillet or Dutch oven, heat 1.5 cups vegetable oil over medium heat until it reaches 350°F. You'll need about 10 minutes for the oil to reach the proper temperature. Test it by dropping a small piece of potato batter into the oil—it should sizzle and float to the surface immediately. If it sinks or bubbles excessively, wait a few more minutes for the oil to heat properly.
Working in batches to avoid overcrowding, carefully spoon the potato mixture into the hot oil using a large spoon or ice cream scoop. Fry for 3-4 minutes per side until the potato crowns are deep golden brown and crispy on the outside. Use a slotted spoon to transfer them to a paper towel-lined plate to drain excess oil. The key here is patience—don't rush the frying or they'll turn greasy instead of crispy. Keep the oil at 350°F between batches by adding more oil if needed.
Create the Buttery Hearts and Assemble
In the same skillet (after removing most of the oil with a paper towel), melt the 0.5 cup unsalted butter over low heat. Once melted, add the fried potato crowns back to the pan and let them sit for 1 minute to absorb the butter flavor. The butter should coat the bottom of the pan, creating a rich, golden pool that the potatoes will soak up.
Transfer the buttery potatoes to a serving platter. For an extra touch, sprinkle with 0.25 cup chopped fresh dill just before serving. The dill adds a bright, herbal note that cuts through the richness of the butter and potatoes. Serve immediately with 0.5 cup sour cream on the side for dipping or dolloping over the top. The contrast between the crispy crowns and the buttery centers makes every bite worth waiting for.
Master the Timing for Perfect Results
While the potatoes are frying, keep an eye on the oil temperature—it should stay between 340°F and 360°F for best results. If the oil gets too hot, the outsides will burn before the insides cook through. You'll know they're done when the potato crowns are golden brown and the centers are tender but not mushy when tested with a fork. They should hold their shape but still be soft inside.
This dish is best served immediately while the potatoes are hot and crispy. If you need to hold them for a few minutes, cover loosely with aluminum foil to keep them warm. The buttery hearts will soak up any residual moisture, so don't skip the final step of melting butter in the pan—it's what transforms this from good to absolutely delicious. The sour cream on the side lets everyone customize their level of creaminess, and the dill adds that fresh, bright finish that ties everything together.
Pro Tips For Making Russian Potato
- Soak Those Potatoes: Toss peeled Russets in cold water for 10 minutes before slicing—this stops them from oxidizing and turning brown. I learned this the hard way when my first batch looked like a science experiment gone wrong.
- Fry in Batches: Crowd the pan and you’ll steam the potatoes instead of fry them. Use 2-3 inches of oil and keep batches small—overloading is how you end up with soggy, unevenly cooked slices.
- Dry Eggs Thoroughly: Pat those eggs dry before dredging in flour—wet eggs make the coating clump like glue. I skip the paper towel and use a clean kitchen towel instead; it’s faster and works just as well.
- Vinegar Fix for Sticky Batter: Mix 1 tablespoon white vinegar into the flour before dredging. It cuts greasiness and keeps the coating crispy. Sounds weird, but it works—my grandmother swore by it, and she was right.
Troubleshooting perfect results
Oil Too Hot?
If your draniki turn dark brown too quickly or burn on the outside before cooking through, your oil is too hot. The ideal temperature is 340-360°F—anything above 370°F will scorch the exterior while leaving the inside raw.
I use a Thermoworks Thermapen to monitor temperature precisely. If you don’t have a thermometer, test with a small piece of batter—it should float immediately and sizzle gently without smoking excessively. 🌡️
Potatoes Turning Mushy
Mushy draniki usually mean excess moisture in the batter or overmixing. First, ensure your potatoes are cold and drained thoroughly—wrap them in a clean towel and squeeze gently to remove all liquid. Second, don’t overmix the batter after adding eggs; just fold until combined.
For extra insurance, add 1 extra tablespoon of flour if your potatoes are particularly wet. I’ve also found that resting the batter for 15 minutes (instead of 10) helps bind the mixture better.
Batter Not Holding Shape
If your potato pancakes fall apart when frying, the binding agents aren’t working properly. Double-check your egg-to-flour ratio—2 eggs per 3 lbs potatoes is standard, but if your potatoes are extra starchy, add 1 extra tablespoon of flour. Another trick: chill the batter for 30 minutes before frying.
Cold temperatures help the starches firm up, making them easier to handle. I also recommend using a Dutch oven for frying—its deep sides contain splatters and maintain even heat better than a skillet.
Greasy Instead of Crispy
Greasy draniki happen when the oil isn’t hot enough or the potatoes absorb too much oil. First, ensure your oil is at 350°F—use a thermometer to confirm.
Second, drain fried pancakes on a wire rack (not paper towels) for 2 minutes to let excess oil drip off before transferring to a plate. For extra crispiness, pat the fried pancakes with a paper towel after draining.
I also recommend frying in smaller batches—overcrowding lowers the oil temperature and makes the potatoes greasy.
Uneven Cooking
If one side cooks faster than the other, your heat source isn’t even. Gas stoves can create hot spots, so stir the oil occasionally to distribute heat. Electric stoves are more consistent, but place your pan on the back burner if your stove has hotter front burners.
For uneven browning, flip the pancakes gently with a thin spatula—don’t press down, or they’ll flatten. If you’re frying in batches, keep the oil at 350°F between batches by adding 1-2 tablespoons of fresh oil per batch.
Storing Leftovers Properly
Leftover draniki lose crispiness if stored incorrectly. Cool them completely, then place in an airtight container with a paper towel on top to absorb moisture. Reheat in a 375°F oven for 10-12 minutes—this restores some crispiness.
For the fridge, they’ll keep for 3-4 days, but for longer storage, freeze the cooked pancakes (unstacked) for up to 1 month. To reheat from frozen, bake at 375°F for 15-18 minutes, flipping halfway. 💡
Nutrition facts
Frequently asked questions
What kind of potatoes work best for this Russian recipe?
Russet potatoes are ideal because they're starchy and hold their shape when grated. If you can't find them, Yukon Golds work well too. Avoid waxy varieties like red potatoes—they won't give you that perfect crispy texture. Always grate them fresh and keep them cold to prevent browning before frying.
Can I make this recipe ahead of time?
The potato mixture can be prepared 24 hours ahead and stored in an airtight container. For best results, fry them fresh, but you can reheat leftovers in a 375°F oven for 10-12 minutes to restore some crispiness. The flavor actually improves after the first day as the ingredients meld together.
Why does the recipe call for vinegar?
The white vinegar creates that signature crispy exterior while balancing the richness of the butter. It also helps tenderize the potatoes slightly. If you're out, apple cider vinegar or lemon juice work in a pinch, though the flavor won't be identical. The tang is what makes these draniki taste authentically Russian.
How do I keep the potatoes from turning greasy?
Greasy results usually mean the oil wasn't hot enough or the potatoes absorbed too much. Always fry in batches at 350°F and drain them on a wire rack (not paper towels) for 2 minutes to let excess oil drip off. For extra crispiness, pat them with a paper towel after draining. Overcrowding the pan also makes them greasy—keep batches small!
What are the best ways to serve these potato pancakes?
These draniki are fantastic as a side for hearty beef dishes like beef Stroganoff or as a standalone appetizer. Serve with sour cream for dipping, a sprinkle of fresh dill, or a simple smoked salmon topping. They also pair beautifully with a cold pickled vegetable salad to cut through the richness.