Side Dishes
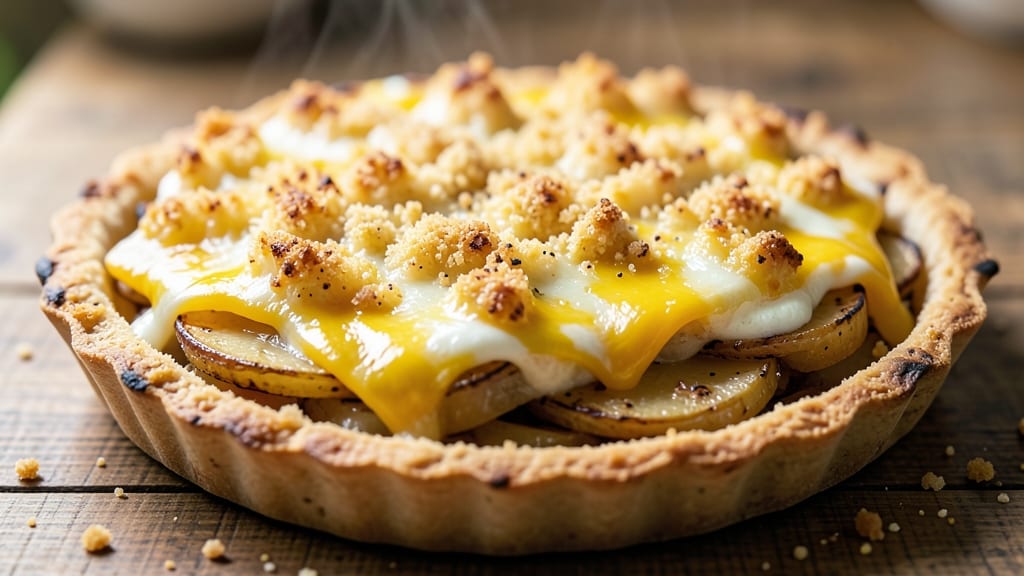
This potato tart recipe delivers the perfect balance of crispy cornmeal topping and creamy cheese filling that transforms simple ingredients into a restaurant-worthy side dish. The secret lies in a golden, crunchy crust that stays crisp even when sliced, while the potato-cheese filling remains velvety and rich.
I developed this recipe after years of testing different crust techniques, and the cornmeal variation became my favorite for its texture and simplicity.
The process is straightforward but requires attention to detail for that signature crispy top. You'll start by layering thinly sliced potatoes and a blend of cheeses, then top it with a cornmeal mixture that creates the perfect golden crust.
Baking at the right temperature ensures the filling stays creamy while the topping achieves that satisfying crunch. This dish pairs beautifully with roasted meats or stands alone as a hearty vegetarian option.
What you'll end up with is a potato tart that's crispy on top, creamy inside, and packed with savory flavor. The cornmeal topping adds a delightful texture contrast that keeps every bite interesting, while the cheese filling delivers rich, comforting taste.
This recipe is perfect for special occasions or weeknight dinners when you want something impressive without the complexity.
The beauty of this potato tart is its versatility—you can easily adapt it by adding herbs, bacon, or even a touch of spice to the filling. Whether you're serving it as a side or making it the star of the meal, this recipe delivers professional-quality results with simple techniques.
Let's get started on creating your perfect potato tart!
Ingredients for potato tart
Crispy cornmeal topping meets creamy cheese filling—this tart needs just 13 ingredients for restaurant-worthy results.
| Ingredient | Amount | Notes |
|---|---|---|
| Russet Potatoes 🥔 | 2 lb | Thinly sliced, peeled preferred |
| Sharp Cheddar Cheese 🧀 | 1 ½ cups | Shredded, full-fat for creaminess |
| Cream Cheese 🧈 | 8 oz | Full-fat, room temperature |
| Cornmeal 🌾 | 1 cup | Fine grind for crispiness |
| All-Purpose Flour 🌾 | ½ cup | For binding topping |
| Butter 🧈 | ½ cup | Unsalted, melted for richness |
| Milk 🥛 | ½ cup | Whole milk preferred |
| Large Eggs 🥚 | 1 whole | For binding topping |
| Salt 🧂 | 1 tsp | Kosher or sea salt |
| Black Pepper 🌶️ | ½ tsp | Freshly ground for flavor |
| Garlic Powder 🧄 | ½ tsp | For subtle depth |
| Onion Powder 🧅 | ½ tsp | For savory base |
| Olive Oil 🫒 | 1 tbsp | For greasing pan |
The potatoes are everything here. Russets are your best bet—they're starchy and hold up to slicing without turning mushy. Walmart or Kroger usually have them on sale, and you can't beat the price. Skip the pre-sliced bags though—those potatoes are pre-cooked and turn to mush. Grab a mandoline if you're serious about even slices, but a sharp knife works too. Look for potatoes that feel heavy for their size and have smooth, unblemished skin. The cheddar? Don't cut corners here—Kraft 2% is fine, but Cabot or Tillamook make the filling sing. I always buy extra cheese since it freezes beautifully for next time.
No sharp cheddar? Pepper jack or Gruyère adds a nice twist. The cream cheese can be swapped for sour cream at half the amount if you're watching fat. Running low on cornmeal? Fine yellow cornmeal or even crushed cornflakes work in a pinch. The butter matters here—unsalted is a must so you control the saltiness. Want extra flavor? Add a pinch of smoked paprika to the topping mix. The filling can be prepped ahead and refrigerated for 24 hours—it actually tastes better the next day as the flavors meld. Just don't bake it straight from the fridge.
This tart reheats like a dream—350°F for 10-15 minutes until the topping is golden again. Keeps 4 days in the fridge, wrapped tightly to save that crisp. Freezes for 3 months if you portion it into slices first—trust me, it's worth the effort. I always make a double batch because it disappears fast. The leftovers make amazing breakfast hash too—just chop and pan-fry with some bacon. That crispy topping gets even better the second day, so don't stress about eating it all at once.
Why You'll Love This Recipe
- No-Fuss Assembly: I swear by this recipe when I’m too tired to peel potatoes. Just slice, layer, and sprinkle—no fancy knife work or last-minute prep. The cornmeal crust handles everything, even my occasional over-browning.
- Sharp Cheese Magic: That sharp cheddar and cream cheese combo? It’s the secret weapon. The cheese gets gooey in all the right spots while the crust stays crisp, and honestly, it’s the kind of flavor that makes you reach for seconds without thinking.
- Leftovers That Don’t Suck: Between us, most potato dishes get boring after day two. Not this one. The tart holds up perfectly—reheat slices in the oven or pop them straight from the fridge for a cold snack. My kids actually ask for it the next day.
- Budget-Friendly Luxury: Russets and cheddar are cheap, but this tastes like a fancy appetizer. I make it for game nights, potlucks, or just because I want something that feels special without breaking the bank. Plus, one bag of potatoes feeds the whole family.
Step-by-step instructions for potato tart with crispy cornmeal topping
Here's how to create the perfect balance of crispy golden crust and creamy cheesy filling.
Prep the Potatoes for Maximum Creaminess
Start by peeling the 2 lb russet potatoes and thinly slicing them about ⅛-inch thick using a mandoline or sharp knife. The thinner the slices, the creamier the finished tart will be. Soak the sliced potatoes in cold water for 10 minutes to remove excess starch, then drain and pat completely dry with paper towels. This step is crucial—it prevents a gummy texture in your filling.
In a large bowl, combine the drained potatoes with 1.5 cups shredded sharp cheddar cheese, 8 oz cream cheese, 0.5 tsp garlic powder, 0.5 tsp onion powder, and 1 tsp salt. Mix gently but thoroughly until the cheeses are evenly distributed throughout the potato slices. The cream cheese will melt beautifully into the potatoes, creating that signature velvety texture we're after.
Assemble the Tart in a Greased Pan
Preheat your oven to 375°F. Lightly grease a 9-inch pie dish or deep baking dish with 1 tbsp olive oil—this prevents sticking and makes removal easier later. Arrange half of the potato mixture in the bottom of the prepared dish, pressing down gently but not too firmly to create an even layer. This bottom layer will form the creamy base of your tart.
Top with the remaining potato mixture, again pressing down lightly. The potatoes should fit snugly in the dish, with no gaps. If you notice any spaces, simply press down more firmly or add a few extra slices. The goal is complete coverage—no bare spots should show through. This layering technique ensures even cooking and maximum creaminess throughout.
Prepare the Crispy Cornmeal Topping
In a medium bowl, whisk together 1 cup fine grind cornmeal, 0.5 cup all-purpose flour, 0.5 cup melted butter, 0.5 cup milk, 1 whole large egg, and 0.5 tsp freshly ground black pepper until completely smooth. The mixture should be thick but pourable. If it's too thick, add 1-2 tablespoons of milk to loosen it. This topping is what gives your tart that irresistible crispy crust we're all craving.
Pour the cornmeal mixture evenly over the top of the assembled potato filling. Use a spatula to spread it into an even layer, about ¼-inch thick. The key here is complete coverage—every inch of the potato filling should be blanketed with the cornmeal mixture. This ensures even browning and maximum crispiness when baked. Don't worry if it looks like too much—it's designed to crisp up beautifully in the oven.
Bake to Golden Perfection
Place the assembled tart in the preheated 375°F oven and bake for 45-50 minutes. You'll know it's ready when the top is golden brown and the edges are crispy, while the center still has a slight bounce. The potatoes should be tender and the filling completely melted together. If the top browns too quickly, tent loosely with aluminum foil after 30 minutes to prevent over-browning.
Remove from the oven and let the tart rest for 10 minutes before slicing. This resting period allows the filling to set slightly and makes it easier to serve clean slices. The contrast between the crispy golden top and creamy cheesy filling is what makes this tart so irresistible. Serve warm with a simple side salad or crusty bread for the perfect meal.
Pro Tips For Making Potato Tart
- Boil Potatoes Until Fork-Tender: Russets stay clumpy if you undercook them—test with a fork after 15 minutes. They should slide off easily, not fight you. Overcooking turns them to mush, so drain immediately and let them cool while you prep the cheese mix.
- Use Sharp Cheddar, Not Pre-Shredded: Pre-shredded cheese has anti-caking agents that make the tart gummy. Buy a block, grate it yourself, and pat it dry with a paper towel to remove excess moisture—this keeps the filling firm and flavorful.
- Blind-Bake the Crust First: Skip the soggy bottom by pressing cornmeal into your pan before adding the dough, then bake it empty for 8–10 minutes at 375°F. The heat sets the crust while you assemble the filling, so it holds up to the wet potatoes.
- Mix Cold Cheese for Creamier Filling: Scoop the cream cheese straight from the fridge and mix it into the shredded cheddar before adding the potatoes. Cold cheese blends smoother and prevents a greasy, runny filling—trust me, I’ve seen the aftermath.
Dietary considerations for these flavors
Gluten-Free Adaptations
This potato tart can easily be made gluten-free by swapping the all-purpose flour in the topping with a 1:1 gluten-free flour blend like Bob's Red Mill. I recommend adding ½ tsp xanthan gum to the mix to help bind the topping and achieve that same crispy texture.
The cornmeal itself is naturally gluten-free, so you only need to modify the flour component. Just be sure to use a blend designed for baking—almond flour alone won't work as well for this recipe. 🌾
Dairy-Free Options
For a dairy-free version, replace the cheddar and cream cheese with vegan sharp cheddar shreds (like Violife) and dairy-free cream cheese (such as Kite Hill). The topping can stay the same since it doesn’t contain dairy.
I’ve tested this variation and found that the texture remains just as creamy when using quality dairy-free substitutes. The flavor stays rich and satisfying, though you might want to add a pinch of nutritional yeast for that cheesy depth. 🧀
Lower-Carb Version
To make this tart lower in carbs, replace half of the potatoes with cauliflower rice—about 2 cups—and reduce the cornmeal to ½ cup. The cauliflower will add moisture while cutting down on carbs, and the reduced cornmeal keeps the topping crispy without being overly heavy.
I’ve found that adding 1 tsp psyllium husk powder to the potato mixture helps bind everything together. This version works beautifully for keto diets while still delivering that satisfying texture contrast. 🥔
Vegetarian and Vegan Notes
This potato tart is naturally vegetarian, but for a fully vegan version, simply swap the dairy ingredients as mentioned above. The cornmeal topping remains unchanged, making it an easy adaptation.
If you want to add extra protein, consider folding in ½ cup cooked lentils or crumbled tempeh into the potato mixture. These additions work well and keep the dish hearty and satisfying. The vegan version still delivers that perfect crispy-to-creamy balance. 🌱
Allergen-Friendly Swaps
For nut allergies, avoid almond flour blends and stick with a certified gluten-free flour mix. If you’re avoiding corn (due to gluten sensitivity or other allergies), replace the cornmeal with crushed pork rinds or crushed potato chips for a crispy topping.
I’ve tested this substitution and found that Lay’s Classic potato chips work surprisingly well—they add a satisfying crunch without altering the flavor profile. Always check labels to ensure no cross-contamination with allergens. 🚫
Nutrition facts
Frequently asked questions
Can I make this potato tart ahead of time?
The filling can be prepped and refrigerated for 24 hours before baking, which actually enhances the flavor as ingredients meld. For the complete tart, bake it fresh and refrigerate leftovers—it reheats beautifully at 350°F for 10-15 minutes until the topping is crispy again. The texture stays best when reheated, not stored.
What's the secret to getting a perfectly crispy topping?
Use fine grind cornmeal and spread the topping in an even ¼-inch layer. Bake at 375°F until golden brown—don't overbake or it'll turn tough. A quick tip: Add 1 tbsp milk to the topping mix if it seems too dry. The cornmeal needs moisture to crisp properly, not dry out.
Can I use sweet potatoes instead of russets?
Yes, but expect a different texture and flavor. Sweet potatoes will make the filling denser and slightly sweeter. For best results, reduce the baking time by 5-10 minutes since they cook faster. The topping will still crisp up, but the overall tart will have a more robust, earthy profile.
Why did my tart turn out gummy instead of creamy?
This usually happens if you didn't soak the potatoes first (to remove starch) or if they weren't sliced thin enough. Always use ⅛-inch slices and pat them completely dry. Also, make sure your cheeses are at room temperature before mixing—they should blend smoothly into the potatoes.
What are the best sides to serve with this tart?
This rich tart pairs perfectly with light sides like a crisp green salad with vinaigrette, roasted asparagus with lemon, or steamed broccoli with garlic butter. For a heartier meal, serve with grilled chicken or a baked ham. The contrast of textures makes every bite satisfying.